Control Layer Overview
Overview of the Doubleword Control Layer, a platform for AI model management with secure and scalable access control.
The Doubleword Control Layer is the world’s fastest AI model gateway (450x less overhead than LiteLLM). It provides a single, high-performance interface for routing, managing, and securing LLM inference across model providers, users and deployments - both open-source and proprietary.
Why Use the Control Layer?
Transform your AI infrastructure from scattered API calls to a centralized, secure, and manageable platform that scales with your organization.
Key Resources
GitHub Repo — Explore the open-source Control Layer code.
Onwards Documentation — Configure and run the standalone Onwards router.
Announcement Blog — Read the launch announcement and background story.
Demo Video — Watch the Control Layer in action.
CTO Blog — Technical deep dive by Fergus Finn.
Benchmarking Writeup — Performance comparison vs alternatives.
Key Capabilities
OpenAI-Compatible API
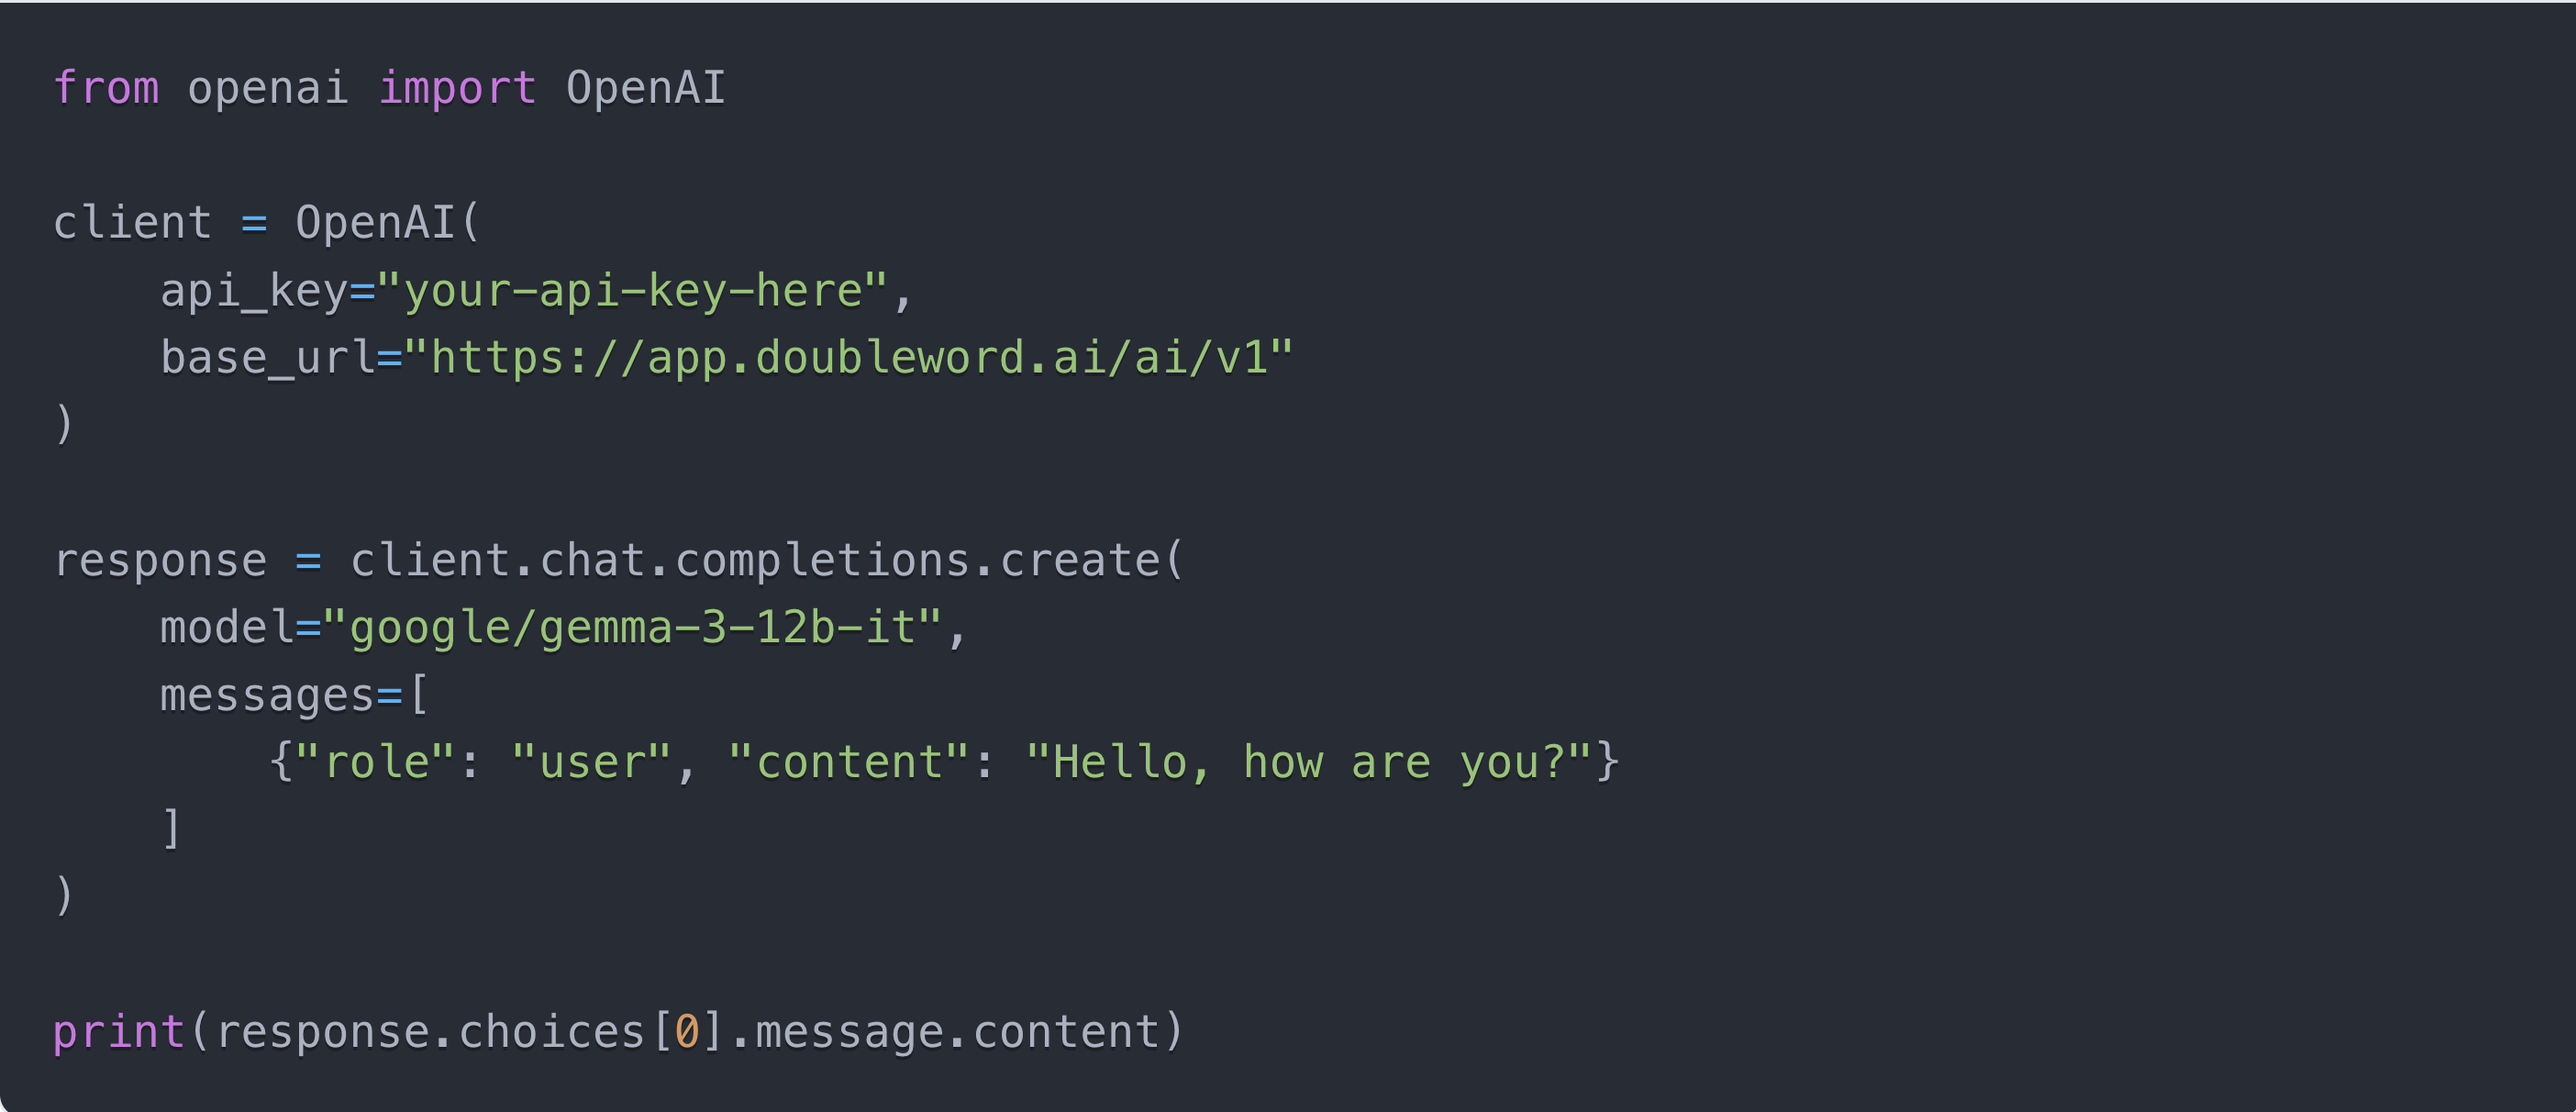
A single OpenAI-compatible gateway to all of your AI models across all your providers. Your existing code works without modification - point your applications to the Control Layer’s /ai/ endpoints and supply a Control Layer API key.
Learn more about API access ->
Learn more about adding endpoints ->
Centralized User Management & API Key Authentication
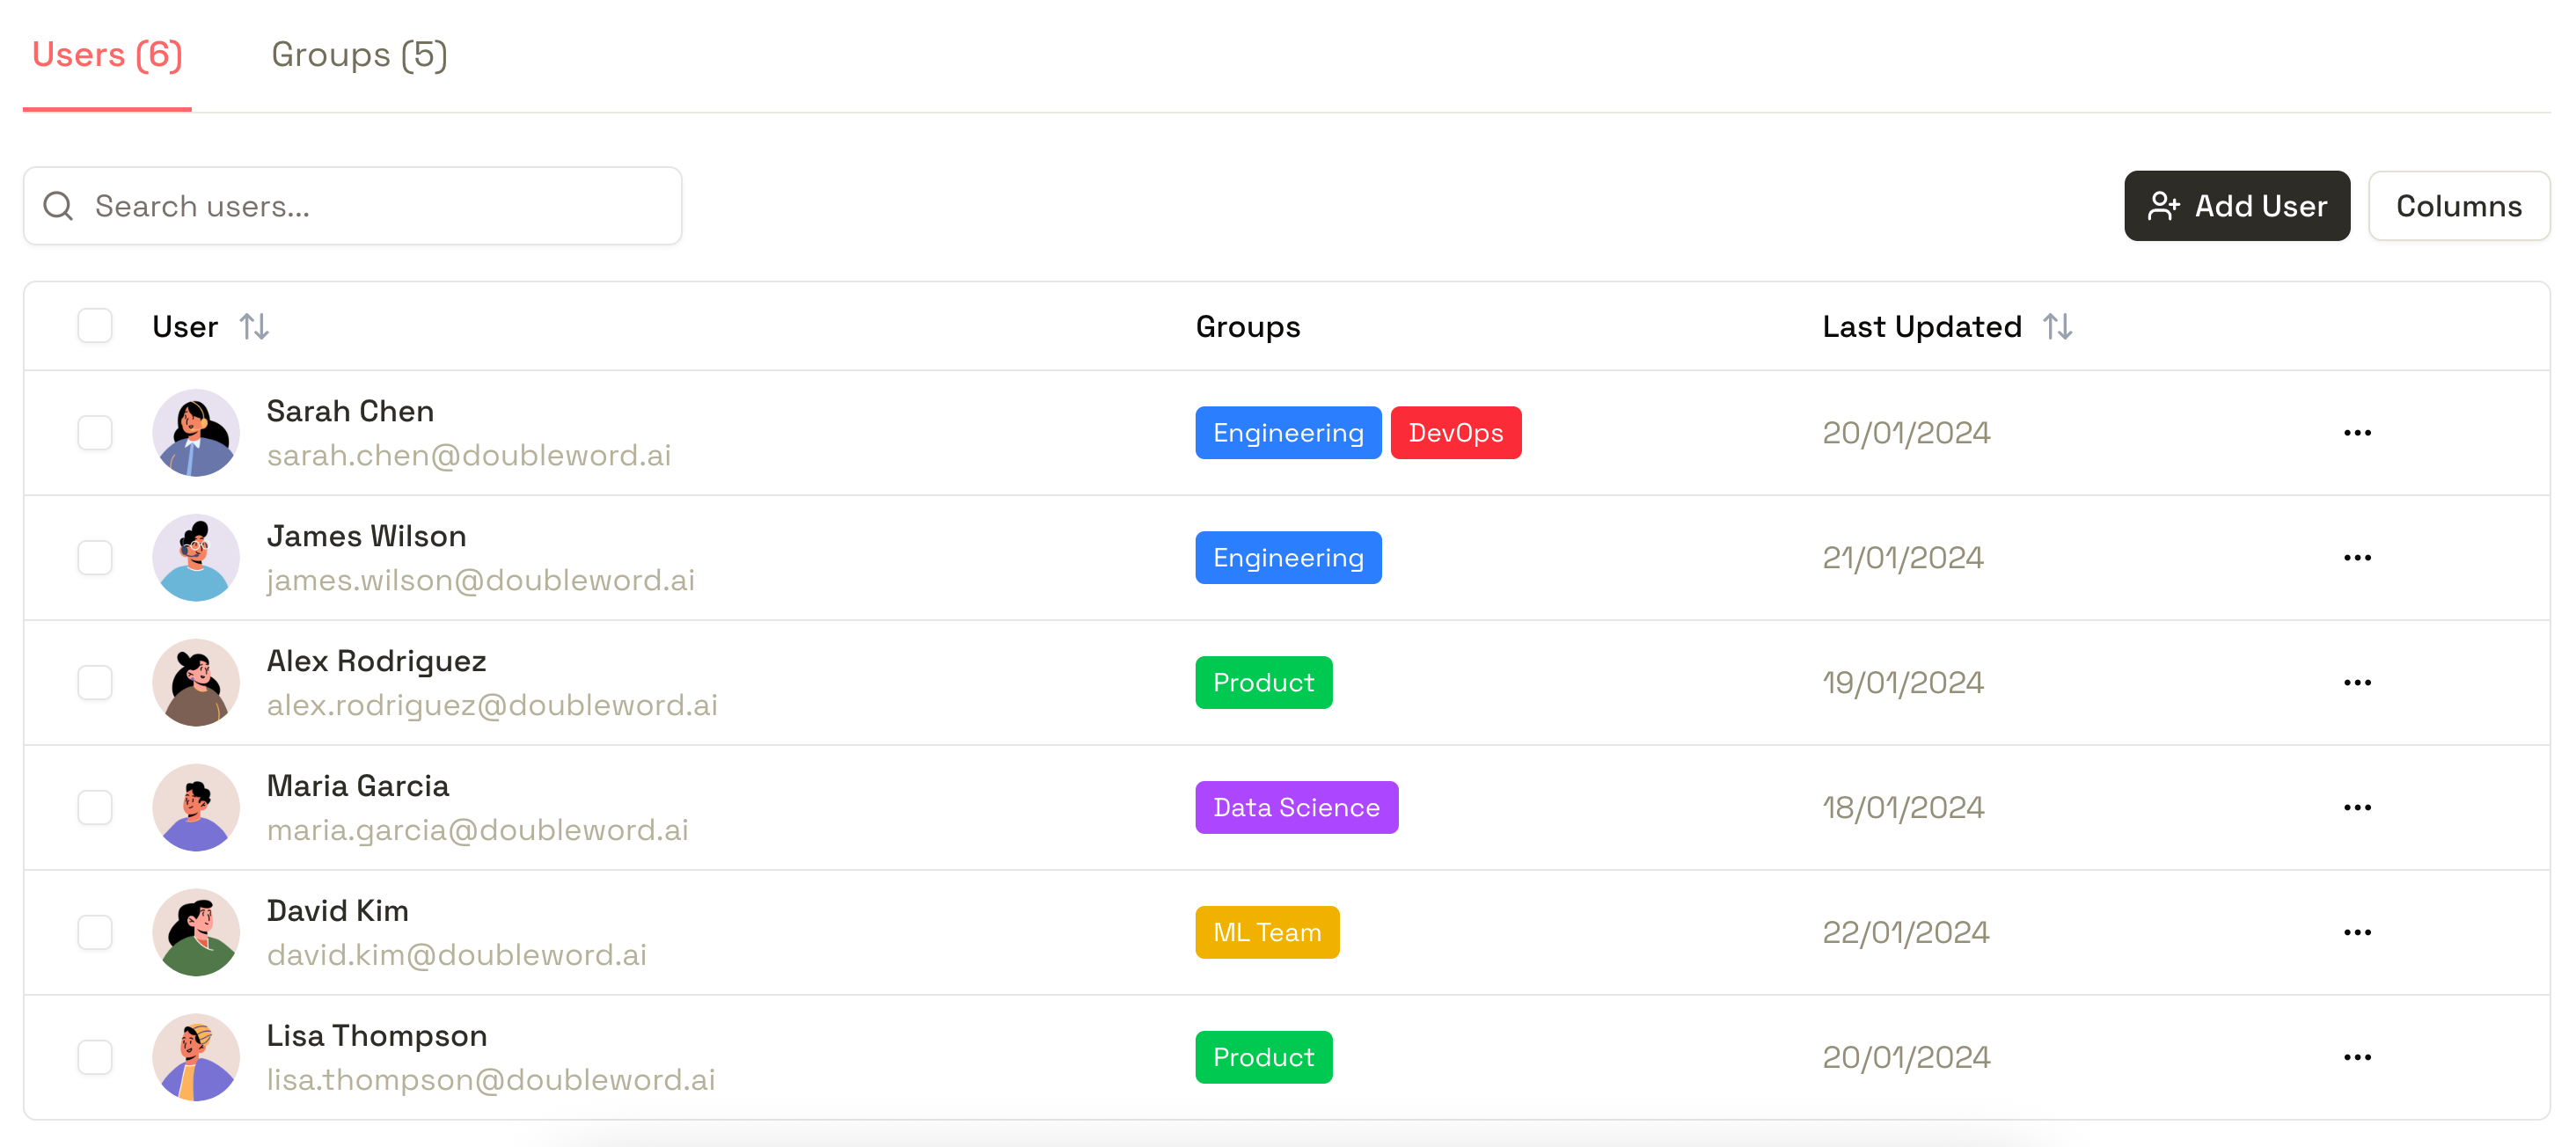
Manage all the users that can access your AI models from one interface. Map users to groups, let users create their own API keys, and monitor usage across your organization.
The Control Layer turns unauthenticated, self-hosted model deployments into production-ready services with user authentication and access control.
Learn more about Users & Groups ->
Real-Time Monitoring & Analytics
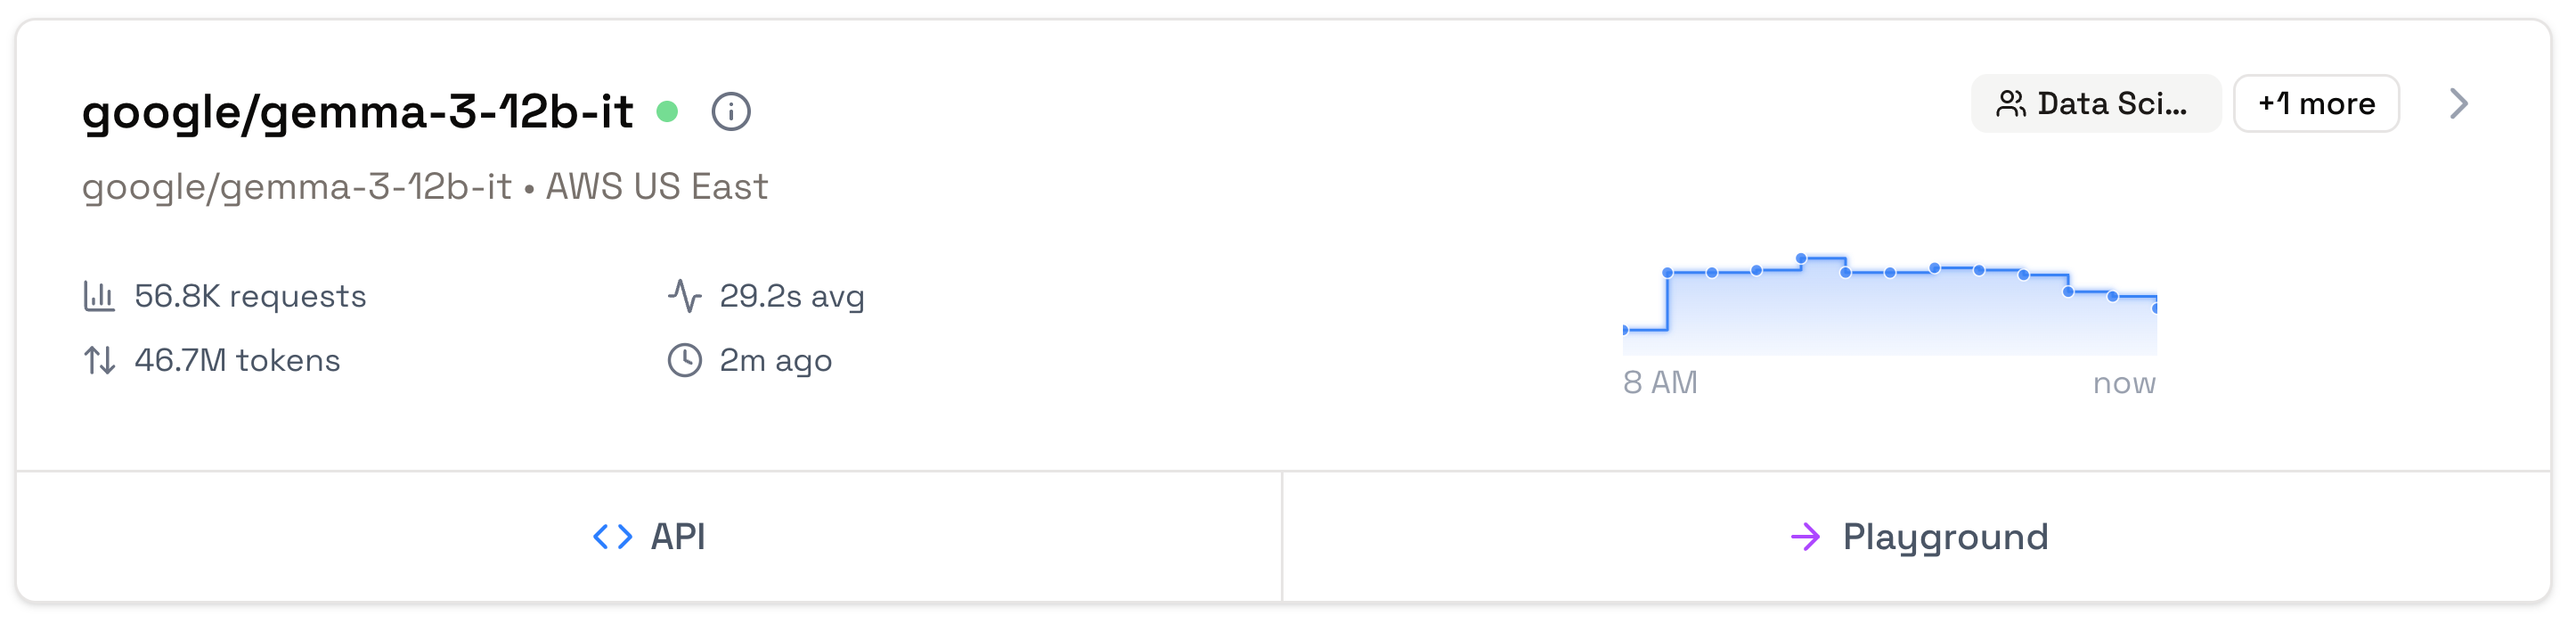
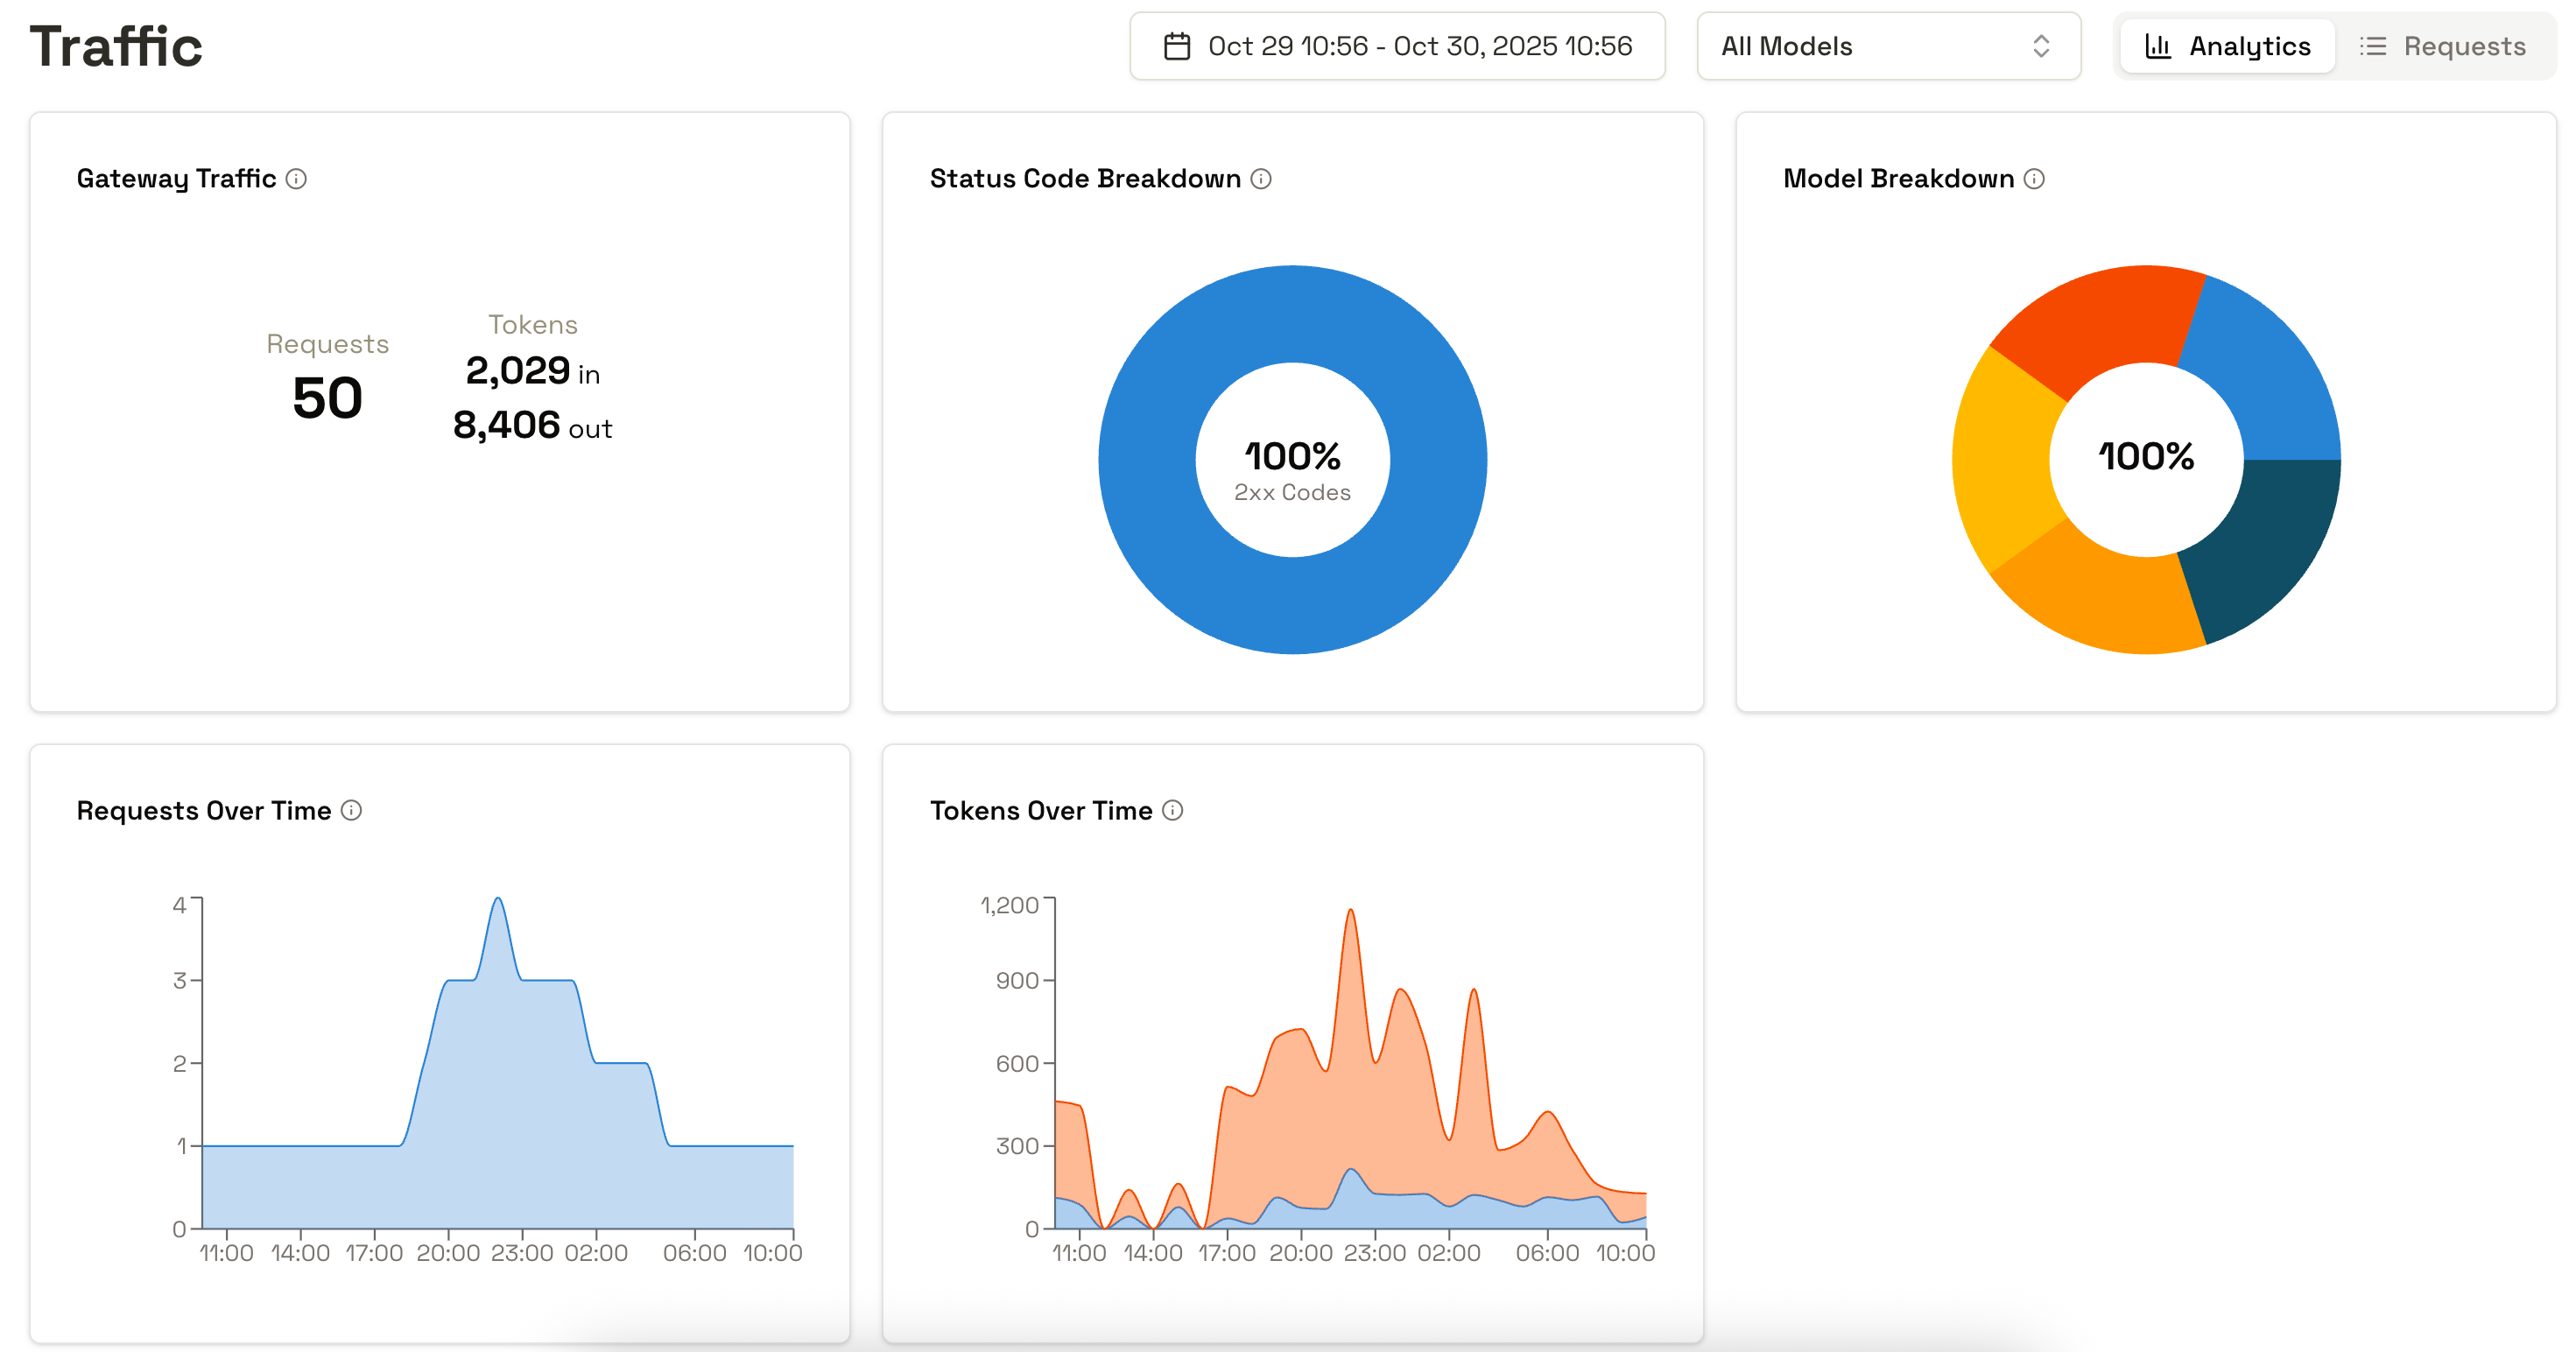
Track request volumes, token usage, response times, and model performance across your entire organization. Built-in analytics help you understand usage patterns, optimize costs, and identify bottlenecks.
Drill down into user behaviour across providers - with opinionated analytics for understanding which models are being used, by whom, and for what purposes.
Interactive Playground
Test and compare generative, embedding, and reranker models side-by-side before integrating them into your applications.
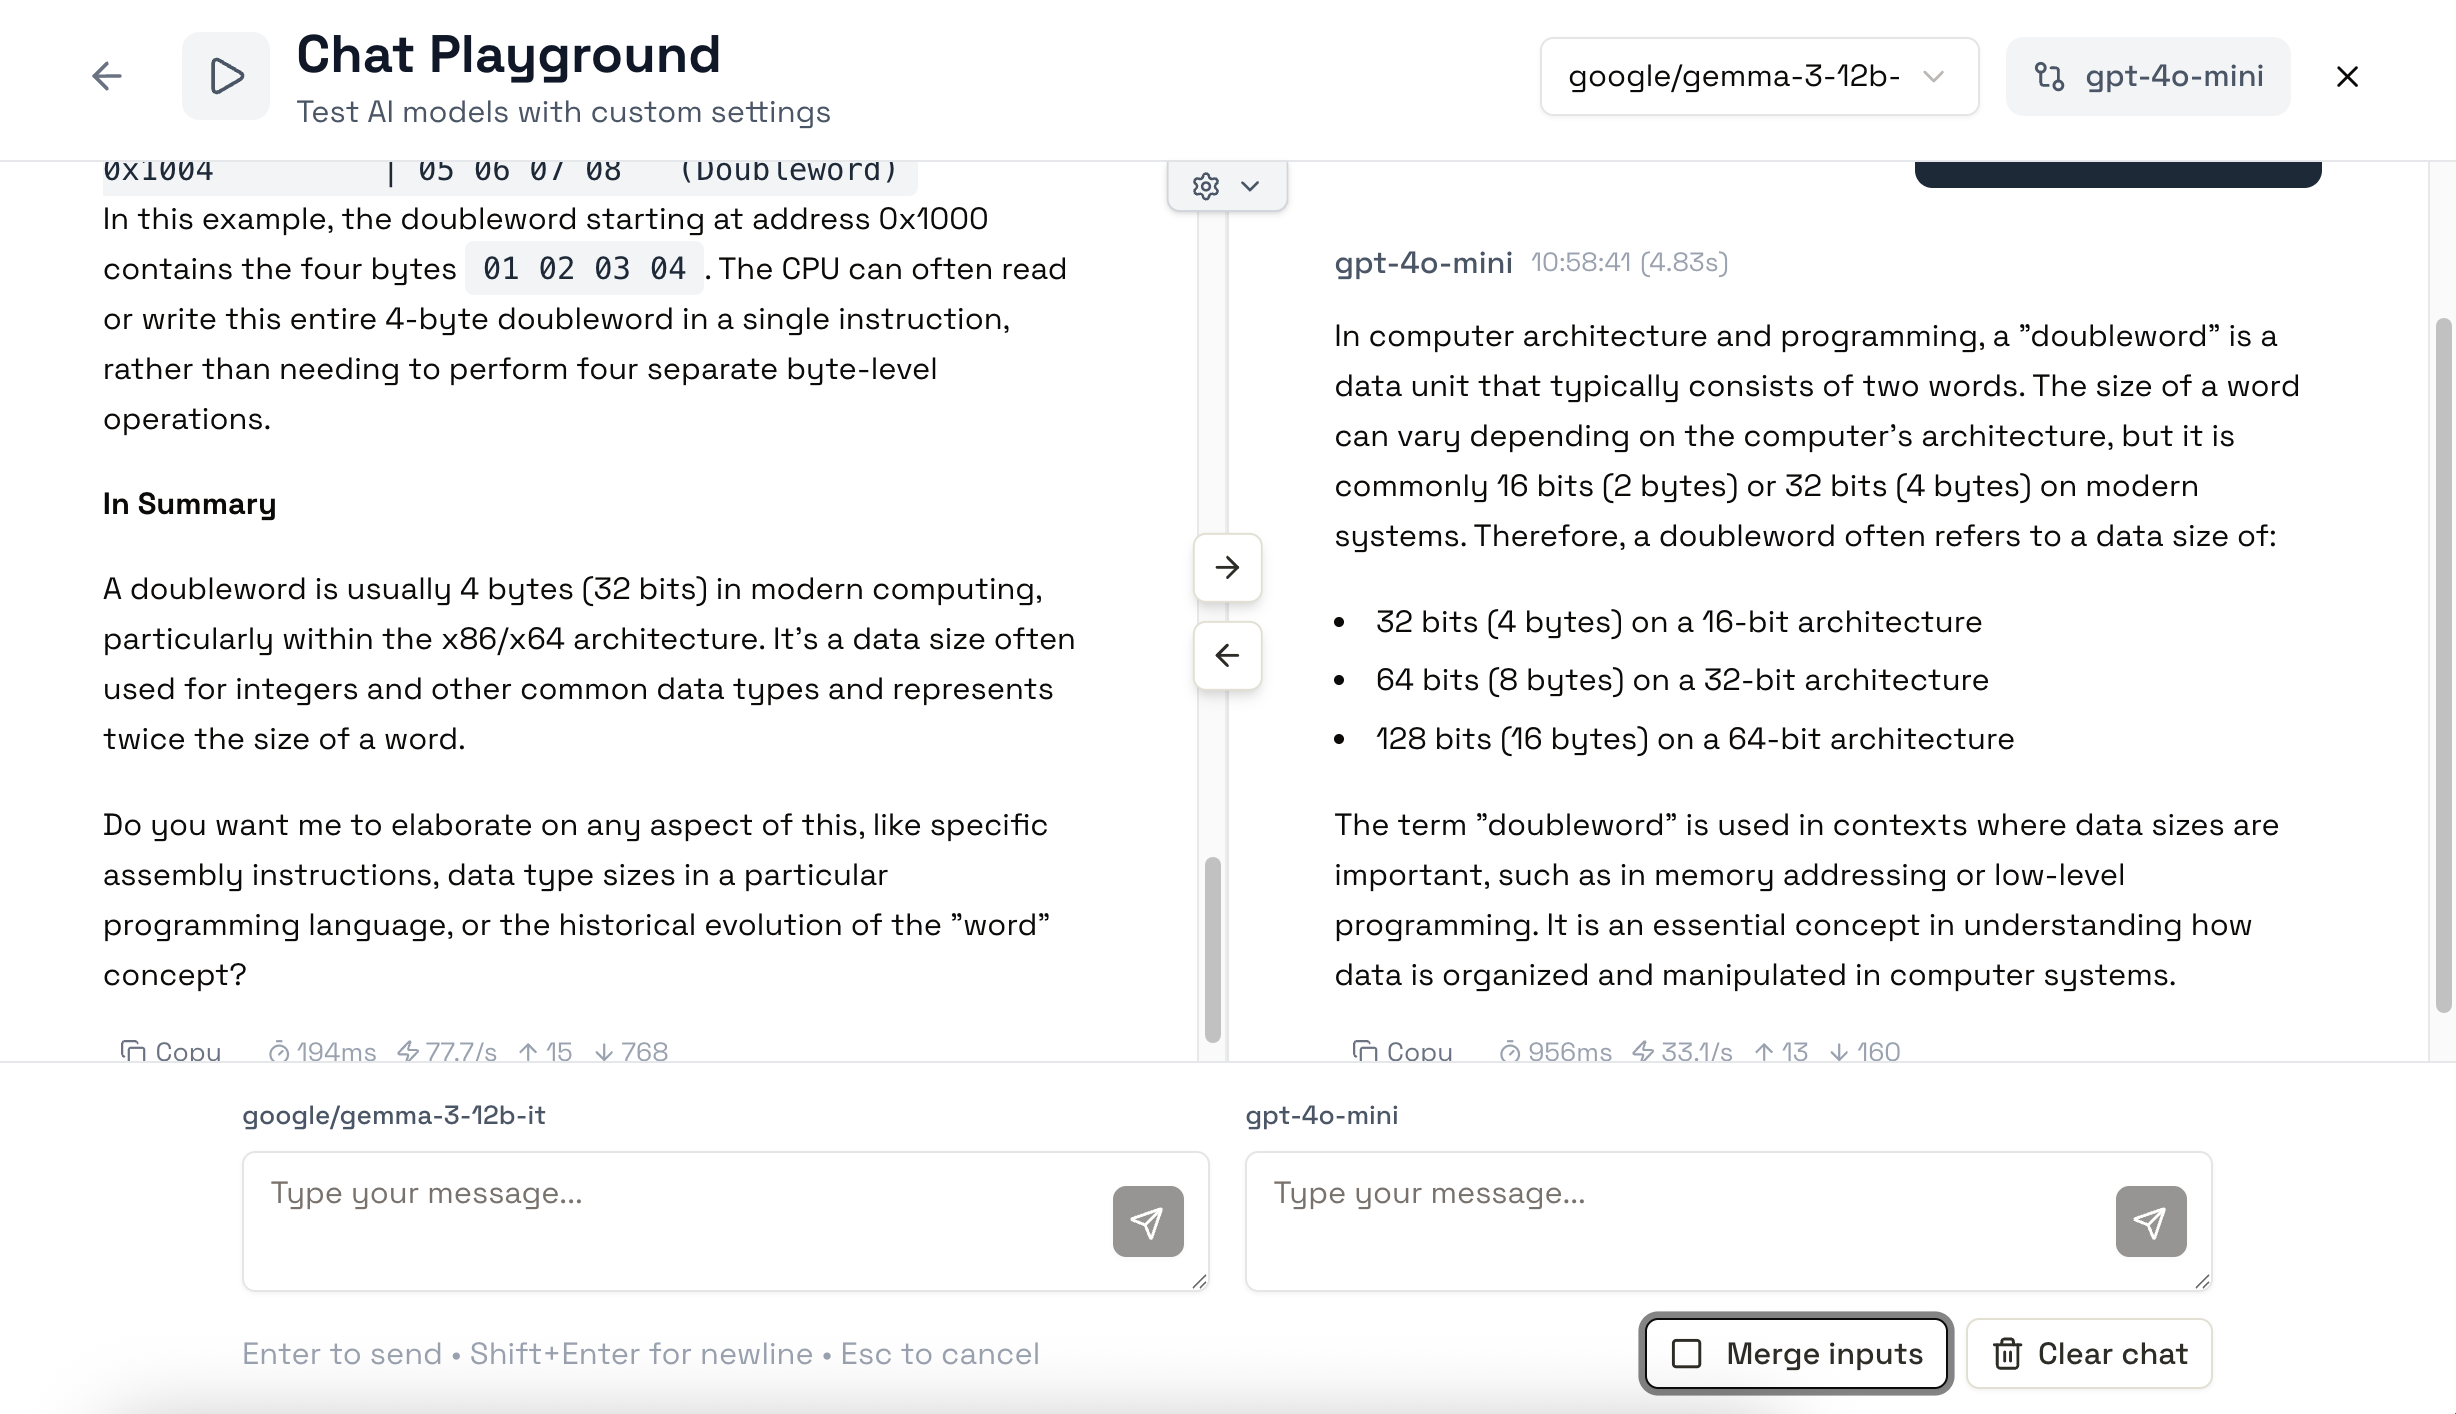
Get started ->
Getting Started
By the end of this tutorial, you’ll have the Control Layer running locally and will have sent your first request to an LLM through it.
Prerequisites
- Docker and Docker Compose installed
- An API key from a model provider. If you don’t have one:
- Doubleword: app.doubleword.ai/api-keys
- OpenAI: platform.openai.com/api-keys
- Anthropic: console.anthropic.com/settings/keys
- Or any OpenAI-compatible endpoint (Together, Groq, local vLLM, etc.)
Step 1: Start the Control Layer
Download the Docker Compose file and start the stack:
wget https://raw.githubusercontent.com/doublewordai/control-layer/refs/heads/main/docker-compose.yml
docker compose up -d
Wait about 30 seconds for the services to initialize1.
Verify
Open
http://localhost:3001in your browser. You should see the login page.
Step 2: Log in to the dashboard
Sign in with the default admin credentials:
| Field | Value |
|---|---|
test@doubleword.ai | |
| Password | hunter2 |
Verify
You see the Control Layer dashboard with Models, Endpoints, Playground, and other items in the sidebar.
Step 3: Add an endpoint
Click Endpoints in the sidebar, then click Add Endpoint.
In the dialog:
- Use the dropdown in the Base URL field to select a popular endpoint (OpenAI, Anthropic, Google), or enter a custom URL
- Paste your API key in the API Key field
- Click Discover Models
The Control Layer connects to your provider and fetches available models.
- Select the models you want to enable, then click Save
Verify
Go to Models in the sidebar. You should see your provider’s models listed.
Step 4: Grant access to a group
Models must be added to a group before users can access them.
On any model card, click + Add groups in the top right corner. Select Everyone (the default group that includes all users), then click Done.
Verify
The model card now shows the group badge.
Step 5: Test in the Playground
On a model card, click Playground.
Type a message and press Enter.
Verify
You receive a response from the model.
Step 6: Send a request via the API
Create an API key
- Click API Keys in the sidebar
- Click Create API Key
- Enter a name (e.g., “test-key”) and click Create Key
- Copy the key now - you won’t see it again
Make a request
Using curl (replace YOUR_API_KEY with the key you copied):
curl http://localhost:3001/ai/v1/chat/completions \
  -H "Authorization: Bearer YOUR_API_KEY" \
  -H "Content-Type: application/json" \
  -d '{
    "model": "gpt-4o-mini",
    "messages": [{"role": "user", "content": "Hello!"}]
  }'
Or using Python:
from openai import OpenAI

client = OpenAI(
    base_url="http://localhost:3001/ai/v1",
    api_key="YOUR_API_KEY"
)

response = client.chat.completions.create(
    model="gpt-4o-mini",
    messages=[{"role": "user", "content": "Hello!"}]
)

print(response.choices[0].message.content)
Verify
You receive a JSON response (curl) or printed output (Python) with the model’s reply.
Done!
You have a working Control Layer instance routing requests to your AI provider.
Next steps:
- Add more endpoints to access additional providers
- Set up users and groups to manage team access
- Configure for production
Before deploying to production
The default configuration is for local development only. Before exposing the Control Layer:
- Change the admin password -
hunter2is not secure- Set a secret key - generate with
openssl rand -base64 32and set viaSECRET_KEYenvironment variable- Use a production database - set
DATABASE_URLto a real PostgreSQL instance- Configure CORS - update
auth.security.cors.allowed_originsfor your domainSee Configuration Reference for details.
-
On first run, Docker downloads the required images which may take several minutes. Run
docker compose logs -fto watch startup progress. ↩
Connect to the API
Learn how to interact with AI models using the Control Layer’s OpenAI-compatible API, including configuration, request handling, and best practices.
The Control Layer provides an OpenAI-compatible API. Use any OpenAI client library by changing the base URL.
Create an API key
- Click API Keys in the sidebar
- Click Create API Key
- Enter a name and click Create
- Copy the key immediately—you won’t see it again
API keys inherit your user permissions. You can only access models assigned to your groups.
Key options
When creating a key, you can optionally set:
- Description: Notes about what this key is for
Configure your client
Point your OpenAI client to the Control Layer:
Python
from openai import OpenAI

client = OpenAI(
    base_url="https://your-control-layer/ai/v1",
    api_key="your-api-key"
)

response = client.chat.completions.create(
    model="gpt-4o",
    messages=[{"role": "user", "content": "Hello!"}]
)
Node.js
import OpenAI from 'openai';

const client = new OpenAI({
    baseURL: 'https://your-control-layer/ai/v1',
    apiKey: 'your-api-key'
});

const response = await client.chat.completions.create({
    model: 'gpt-4o',
    messages: [{ role: 'user', content: 'Hello!' }]
});
curl
curl https://your-control-layer/ai/v1/chat/completions \
  -H "Authorization: Bearer your-api-key" \
  -H "Content-Type: application/json" \
  -d '{"model": "gpt-4o", "messages": [{"role": "user", "content": "Hello!"}]}'
Model names
Use model names exactly as shown on the Models page. The Control Layer routes requests to the correct provider automatically.
If your admin configured model aliases, you can use either the original name or the alias.
You can list models with the OpenAI-compatible GET /ai/v1/models endpoint. By default it returns every active model your API key can access, using the standard OpenAI response shape.
Doubleword also supports optional query-string filters for discovery:
curl "https://your-control-layer/ai/v1/models?group=<group-id>&available_for_realtime=true" \
  -H "Authorization: Bearer your-api-key"
group: comma-separated group UUIDs. Results are still limited to models your API key can access.available_for_realtime:truereturns models without a realtime deny rule;falsereturns models with one.include_reasoning_capabilities: disabled by default to preserve the standard OpenAI model object. Set it totrueto addsupported_reasoning_effortsfor models whose support can be determined across every configured provider. Composite models report the intersection supported by all enabled providers.
Streaming responses
Streaming works the same as with OpenAI directly:
stream = client.chat.completions.create(
    model="gpt-4o",
    messages=[{"role": "user", "content": "Hello!"}],
    stream=True
)

for chunk in stream:
    print(chunk.choices[0].delta.content or "", end="")
Managing keys
From the API Keys page:
- View usage: The “Last used” column shows when each key was last used
- Delete keys: Select keys and click Delete, or click the delete icon on a single key
- Revoke compromised keys: Delete them immediately—there’s no separate revoke action
Create separate keys for different applications so you can revoke one without affecting others.
Troubleshooting
401 Unauthorized: Your API key is invalid or deleted. Check you copied it correctly, or create a new one.
403 Forbidden: Your user account doesn’t have access to the requested model. Ask your admin to add you to a group that has access.
404 Model not found: The model name doesn’t match any available model. Check the exact name on the Models page.
429 Too Many Requests with code inflight_limit_exceeded: your account already has as many realtime requests in flight on that model as its limit allows. Every key on the account shares the limit. The response carries Retry-After: 1; retry after that, or once a request completes, or ask your admin to raise the limit. Batch and async requests are not counted, and the limit only applies on deployments that turn on limits.realtime_inflight.enforce.
502/503 errors: The upstream model provider is having issues. Check the provider’s status page.
Add Endpoints
Learn how to connect the Control Layer to AI inference endpoints by configuring model sources.
Endpoints connect the Control Layer to AI providers. Add an endpoint to make models available to your users.
Add an endpoint
- Click Endpoints in the sidebar
- Click Add Endpoint
- Select a provider from the dropdown (OpenAI, Anthropic, Google) or enter a custom base URL
- Enter your API key
- Click Discover Models
- Select which models to enable
- Click Save
The Control Layer queries the provider’s /v1/models endpoint and imports available models.
Model aliases
During setup, you can assign aliases to models. This lets you use a custom name (like our-gpt4) instead of the provider’s name. Users can call models by either name.
Supported providers
Any OpenAI-compatible API works:
- OpenAI —
https://api.openai.com - Anthropic —
https://api.anthropic.com - Google —
https://generativelanguage.googleapis.com - Together, Groq, Fireworks — enter their API URL
- Self-hosted — vLLM, Ollama, or any OpenAI-compatible server
Custom authentication
Some providers use non-standard authentication. When adding an endpoint, you can configure:
- Auth header name: Default is
Authorization - Auth header prefix: Default is
Bearer
For example, some internal services might use X-API-Key with no prefix.
Edit an endpoint
- Click the endpoint in the list
- Update the name, description, or URL
- Click Save
To change the API key, delete the endpoint and create a new one.
Re-sync models
When a provider adds new models, re-sync to discover them:
- Click the endpoint in the list
- Click Synchronize
- The Control Layer fetches the current model list
New models appear but aren’t automatically enabled. Go to Models to enable them and assign group access.
Delete an endpoint
- Select the endpoint (checkbox)
- Click Delete
Or click the delete icon on a single endpoint.
Warning
Deleting an endpoint removes all its models from the Control Layer. Users will get “model not found” errors for any deleted models.
API key security
Provider API keys are stored encrypted in the Control Layer database. If credentials are exposed elsewhere, rotate them immediately with your provider, then delete and recreate the endpoint.
Troubleshooting
“Connection failed” during discovery: Check that the URL is correct and reachable. Test the API key directly with the provider using curl.
No models returned: The endpoint might not have a /v1/models endpoint, or your API key might lack permission to list models. Try adding models manually if you know their names.
“Alias already exists” error: Another endpoint already uses that alias. Choose a different alias, or remove it from the other endpoint first.
Models not appearing after sync: New models are discovered but disabled by default. Go to Models and enable them.
Authentication errors after setup: The API key may have been rotated or revoked. Delete the endpoint and recreate it with a fresh key.
Manage Users & Groups
Learn how to manage user and group access in Control Layer for efficient model permissions.
The Control Layer uses group-based access control. Users belong to groups, and groups have access to models.
How access works
- Users are created when they first sign in (or by an admin)
- Groups organize users and define what models they can access
- Models are assigned to groups from the model card
Users inherit access to all models assigned to their groups. Changes take effect immediately.
Create a group
- Click Users & Groups in the sidebar
- Click the Groups tab
- Click Create Group
- Enter a name and optional description
- Click Create
Common patterns for group organization:
| Pattern | Example |
|---|---|
| By team | engineering, data-science, marketing |
| By access level | basic-models, advanced-models |
| By project | project-alpha, summer-intern |
| By model | claude-users, gpt4-users, gemini-users |
| Default access | everyone (all users get baseline models) |
Add users to a group
- Click Users & Groups in the sidebar
- Click on the user you want to modify
- Under Groups, select the groups to add them to
- Changes save automatically
Users can belong to multiple groups. Their model access is the union of all their groups’ model access.
Remove users from a group
- Click Users & Groups in the sidebar
- Click on the user
- Under Groups, deselect the groups to remove them from
Alternatively, from the group view:
- Click the Groups tab
- Click on the group
- Find the user in the members list
- Click the remove button next to their name
Assign models to groups
On any model card, click + Add groups to grant access. Models can belong to multiple groups.
Grant admin privileges
Admin users have full system control: they can manage all users, groups, endpoints, and settings.
- Click on the user
- Enable the Admin toggle
Grant admin privileges sparingly. The initial admin user from config always has admin privileges and cannot be demoted.
Delete a user
- Click Users & Groups in the sidebar
- Click on the user
- Click Delete User
- Confirm the deletion
Deleting a user removes their access immediately. Their API keys are also revoked.
Delete a group
- Click Users & Groups in the sidebar
- Click the Groups tab
- Click on the group
- Click Delete Group
- Confirm the deletion
Users in the group will lose access to any models that were only assigned to that group.
Troubleshooting
User can’t see expected models Check their group memberships and verify the models are assigned to those groups. Remember that model access is the union of all groups, so check each group the model is assigned to.
User has unexpected access Review all their group memberships. They may belong to groups you didn’t expect. Click on the user to see all their groups at once.
Need to revoke access quickly Either:
- Remove the user from the relevant groups
- Remove the model from those groups (affects all users in the group)
- Delete the user entirely (if they should have no access)
Can’t delete a group Groups can always be deleted. Users in the group will lose access to models that were only assigned through that group.
Set Up Health Monitoring
Learn how to monitor the status of AI model endpoints using Control Layer’s built-in health monitoring features.
The Control Layer can monitor your endpoints with health checks. Status indicators show whether models are online.
Status indicators
- Green dot: Model is online and responding
- Red dot: Model is offline or failing health checks
- No dot: Monitoring not configured for this model
Set up monitoring
From any model’s detail page:
- Click Configure Monitoring
- Choose a monitor type:
- Default: Sends lightweight requests to the model endpoint
- Custom HTTP probe: Check a specific URL path
- Set the check interval (1 minute, 5 minutes, 15 minutes, or 30 minutes)
- Click Save
The probe starts running immediately after you save.
Custom HTTP probes
Use a custom HTTP probe when:
- Your endpoint has a dedicated
/healthor/statuspath - You want to avoid sending inference requests (which may incur costs)
- The default probe doesn’t work with your endpoint’s authentication
Configure a custom probe:
- Select Custom HTTP probe
- Enter the path (e.g.,
/health,/v1/models) - Optionally add custom headers if the health endpoint requires authentication
- Choose the expected response code (usually 200)
Warning
Default probes send real inference requests to model endpoints. For cost-sensitive endpoints, use a custom HTTP probe pointed at a health endpoint that doesn’t incur usage charges.
Pause and resume monitoring
You can temporarily disable monitoring without deleting your configuration:
- Go to the model’s detail page
- Click Monitoring Settings
- Toggle Active off to pause, or on to resume
Paused probes retain their configuration but don’t run checks or affect status indicators.
View probe statistics
Each monitored model tracks:
- Uptime percentage: Successful checks over total checks
- Last check: When the probe last ran
- Response time: How long the endpoint took to respond
- Recent history: Pass/fail for recent checks
Access statistics from the model’s detail page under Monitoring.
View uptime history
The Models page includes an uptime toggle (top right) showing historical availability for all monitored models as a timeline visualization.
Delete a probe
- Go to the model’s detail page
- Click Monitoring Settings
- Click Delete Probe
This removes all monitoring configuration and history for that model.
Troubleshooting
False negatives (red dot but model works) The monitoring probe may not match the model’s actual API. Try a custom HTTP probe pointed at a known-good endpoint.
Intermittent status May indicate:
- Rate limiting from the provider
- Network issues between Control Layer and the endpoint
- Provider instability
Check probe statistics for patterns (e.g., failures at specific times suggest rate limiting).
Probe never succeeds Verify:
- The endpoint URL is correct
- Authentication credentials are valid
- For custom probes, the path exists and returns the expected status code
High response times Response time is measured from the Control Layer to the endpoint. High times may indicate:
- Geographic distance to the provider
- Provider under load
- Network congestion
Consider this baseline when evaluating actual request performance.
Deploy to Production
Checklist for deploying Control Layer to a production environment.
This guide covers the key changes needed when moving from a local setup to production.
Security checklist
1. Change the admin password
The default config uses hunter2. Change it immediately:
admin_email: "your-admin@company.com"
admin_password: "<strong-password>"
Or set via environment variables:
DWCTL_ADMIN_EMAIL=your-admin@company.com
DWCTL_ADMIN_PASSWORD=<strong-password>
2. Generate a secret key
The secret key signs JWT tokens. Generate a secure one:
openssl rand -base64 32
Set it in your environment:
SECRET_KEY=<your-generated-key>
3. Configure CORS
Add your production frontend URL to allowed origins:
auth:
  security:
    cors:
      allowed_origins:
        - "https://your-app.company.com"
4. Use a production database
Point to your production PostgreSQL instance:
DATABASE_URL=postgres://user:password@your-db-host:5432/control_layer
Infrastructure
Run behind a reverse proxy
In production, run the Control Layer behind nginx, Caddy, or a cloud load balancer that handles:
- TLS termination
- Rate limiting
- Access logging
The Control Layer binds to 0.0.0.0:3001 by default. Your proxy should forward to this.
Enable secure cookies
For HTTPS deployments, enable secure cookies:
auth:
  native:
    session:
      cookie_secure: true
      cookie_same_site: "strict"
Disable registration
Unless you want open signups, keep registration disabled:
auth:
  native:
    allow_registration: false
Admins create users manually via the UI.
Monitoring
Once deployed:
- Set up health monitoring for your endpoints (see Set Up Health Monitoring)
- Monitor the Control Layer’s
/healthendpoint from your infrastructure - Set up log aggregation for request logs
Quick reference
| Setting | Dev default | Production |
|---|---|---|
admin_password | hunter2 | Strong password |
secret_key | None | Random 32+ bytes |
cookie_secure | true | true |
allow_registration | false | false |
cors.allowed_origins | localhost:3001 | Your domain |
Set Up Model Pricing
Configure per-token pricing for your models using tariffs. Set different rates for realtime, batch, and playground usage.
This guide shows you how to configure per-token pricing for your models using tariffs.
Prerequisites
- A deployed model (see Add Endpoints)
- Platform Manager role
Understanding Tariffs
A tariff defines per-token pricing for a model. Each model can have multiple tariffs for different purposes:
| Purpose | Description | Limit |
|---|---|---|
| Realtime | Standard API requests | One per model |
| Batch | Asynchronous batch processing | One per SLA (e.g., 24h) |
| Playground | Dashboard testing | One per model |
Models without tariffs are free to use.
Set Pricing via the Dashboard
- Go to Models in the sidebar
- Click on the model you want to price
- Click Manage Pricing Tariffs
- Click + Add Tariff
- Fill in the pricing details:
- Name: Descriptive label (e.g., “Standard Pricing”)
- Purpose: Select realtime, batch, or playground
- Input price: Cost per 1M input tokens
- Output price: Cost per 1M output tokens
- For batch tariffs, select the SLA (completion window like “24h”)
- Click Save Changes
Pricing takes effect immediately.
Set Pricing via the API
Include a tariffs array when creating or updating a model:
curl -X PATCH "https://your-instance/admin/api/v1/models/{model-id}" \
  -H "Authorization: Bearer $API_KEY" \
  -H "Content-Type: application/json" \
  -d '{
    "tariffs": [
      {
        "name": "Realtime Pricing",
        "input_price_per_token": "0.003",
        "output_price_per_token": "0.015",
        "api_key_purpose": "realtime"
      }
    ]
  }'
Tariff Fields
| Field | Required | Description |
|---|---|---|
name | Yes | Descriptive name for the tariff |
input_price_per_token | Yes | Price per input token (decimal) |
output_price_per_token | Yes | Price per output token (decimal) |
api_key_purpose | No | "realtime", "batch", or "playground" |
completion_window | Batch only | SLA like "24h" |
Note
Prices are stored per-token with 8 decimal places. The dashboard displays prices per 1M tokens for readability. To convert:
\$3.00 per 1M tokens = 0.000003 per token.
Example: Pricing with Multiple Tiers
Configure different prices for realtime, batch, and playground:
{
  "tariffs": [
    {
      "name": "Realtime",
      "input_price_per_token": "0.00003",
      "output_price_per_token": "0.00006",
      "api_key_purpose": "realtime"
    },
    {
      "name": "Batch 24h",
      "input_price_per_token": "0.000015",
      "output_price_per_token": "0.00003",
      "api_key_purpose": "batch",
      "completion_window": "24h"
    },
    {
      "name": "Playground (Free)",
      "input_price_per_token": "0",
      "output_price_per_token": "0",
      "api_key_purpose": "playground"
    }
  ]
}
This configuration:
- Charges full price for realtime API usage
- Offers 50% discount for 24-hour batch jobs
- Makes playground testing free
Updating Prices
When you update tariffs, the system:
- Closes old tariffs by setting their end date to now
- Creates new tariffs effective immediately
- Preserves historical pricing for accurate transaction records
Old transactions are charged at the rate that was active when they occurred. New transactions use the updated rates.
Viewing Current Tariffs
To see a model’s current pricing via API, include pricing in the query:
curl "https://your-instance/admin/api/v1/models/{model-id}?include=pricing" \
  -H "Authorization: Bearer $API_KEY"
The response includes a tariffs array with all active tariffs.
Removing Pricing
To make a model free, update it with an empty tariffs array:
curl -X PATCH "https://your-instance/admin/api/v1/models/{model-id}" \
  -H "Authorization: Bearer $API_KEY" \
  -H "Content-Type: application/json" \
  -d '{"tariffs": []}'
This closes all active tariffs. Requests to the model will no longer incur charges.
Related Topics
- How Billing Works — Understand the credits system
- Configuration Reference — Batch SLA configuration
Organization model overlays
Organization overlays configure per-model serving behavior and pricing for an organization in a Control Layer installation. Account defaults, class grants and model access are configured separately; declaring a price does not grant model access or enable a serving class.
Enable the built-in catalog
Control Layer includes an optional YAML catalog reader and startup reconciler. The catalog files can live on a local filesystem or be mounted into a container; no particular deployment repository, CI service or orchestration system is required. Startup provisioning is disabled by default.
Configure the paths in your Control Layer configuration:
model_provisioning:
  enabled: true
  directory: ./model-provisioning.d
  org_overlays_directory: ./org-overlays.d
Paths are resolved from the server’s working directory. Use absolute paths when mounting configuration files into containers. Enabling provisioning applies both the model catalog and the organization catalog at startup; maintain both as the desired configuration for your installation.
Create organization accounts first. Each organization file references the
account’s username and model catalog aliases. Overlay and organization-price
views in the admin console are read-only; this release provides no management
API for authoring those overlays. Account-level settings remain editable through
the authorized management API and console.
Inspect effective configuration
Platform managers can select General pricing or an organization above the pricing section on a model’s management page. The selection applies to both token prices and cache multipliers. Source labels distinguish organization overrides from inherited general prices. Realtime prices are shown by serving class; batch and flex use standard-class pricing for the specified completion window. A missing batch window uses the realtime safety net only after every exact batch scope has been exhausted; the source label identifies that fallback. With no eligible realtime price either, the view shows unpriced.
Below cache pricing, Serving classes lists the model’s presets and Organisation overlays expands each organization’s explicit settings and price overrides. The organization’s own page groups these same details by model under Model overlays, with a link to its effective model prices.
These inspection controls are restricted to platform managers. Customer price listings continue to show a single all-class organization price set, falling back to general model prices, without exposing class-specific overrides.
Ownership and inheritance
A declared org/model entry is the complete desired overlay and price set. It adopts existing current rows for that pair, including rows inserted directly in the database. For catalog-managed entries, update the YAML source; a database-only change may be replaced on the next reconciliation.
Omitted serving fields inherit account/model defaults. For example, omitting
self_hosted_only restores the account’s preference; false explicitly permits
external providers for that model even when the account default forbids them.
Omitted prices retire the corresponding versions and use the normal pricing
fallbacks. Changed prices close the previous version and create a new one;
historical amounts and references are preserved. Unchanged prices retain their
IDs. Undeclared, previously unowned org/model pairs are untouched.
Removing an owned entry retires its overlay and prices. A mounted empty directory retires all catalog-owned entries; a missing/unconfigured catalog is not a cleanup request. Future-dated prices must be resolved before catalog adoption or editing: startup reconciliation applies immediately and does not author schedules.
Example: batch/flex and class-specific realtime prices
The organization, model alias and prices below are fictional. Token prices are expressed per million tokens:
org: example-organization
models:
  - alias: example-model
    default_class: throughput
    tariffs:
      - name: realtime-default
        purpose: realtime
        input_per_million_tokens: "2.00"
        output_per_million_tokens: "6.00"
      - name: batch-24h
        purpose: batch
        completion_window: 24h
        input_per_million_tokens: "0.50"
        output_per_million_tokens: "1.50"
      - name: batch-1h-and-flex
        purpose: batch
        completion_window: 1h
        input_per_million_tokens: "1.00"
        output_per_million_tokens: "3.00"
    cache_tariff:
      write_multiplier_5m: "1"
      write_multiplier_1h: "1.25"
      write_multiplier_24h: "2"
      read_multiplier: "0.10"
    class_pricing:
      throughput:
        tariffs:
          - name: throughput-realtime
            purpose: realtime
            input_per_million_tokens: "1.50"
            output_per_million_tokens: "4.50"
        cache_tariff:
          write_multiplier_5m: "1"
          write_multiplier_1h: "1.25"
          write_multiplier_24h: "2"
          read_multiplier: "0.08"
      interactive:
        tariffs:
          - name: interactive-realtime
            purpose: realtime
            input_per_million_tokens: "3.00"
            output_per_million_tokens: "9.00"
        cache_tariff:
          write_multiplier_5m: "1"
          write_multiplier_1h: "1.50"
          write_multiplier_24h: "2"
          read_multiplier: "0.15"
For this example, enable the model’s throughput/interactive presets and grant the
organization those classes separately. Realtime requests use the resolved class:
explicit suffix first, then applicable overlay/account/model defaults. Batch and
flex use standard; flex uses the batch 1h tariff. Prefer putting batch prices in
the all-class tariffs list. class_pricing.standard also supports batch;
interactive/throughput batch prices are rejected by validation.
Billing, display and admission
Billing selects the key owner’s class-specific price, then its all-class price, then the general model price. Each scope must match the purpose and, for batch, the exact completion window. Playground may fall back to realtime within the same scope. Batch first exhausts exact-window prices across standard-class, all-class organization and general model scopes. Only if none matches does it try realtime prices in that same scope order, using standard class. It never borrows another batch window or an elevated class’s realtime price. This final fallback supports a single realtime definition as a flat price across tiers. Prefer explicit prices for every supported window so the intended rates are clear. A matching zero batch price stops fallback. With neither a batch nor a realtime match, the request remains unpriced. Continuation and platform keys have no customer tariffs.
Cache multipliers follow class, all-class, then model scope, with the general model cache tariff controlling whether cache billing is enabled. Customer model listings and price sorting show the all-class price or general model price; class-specific prices are visible only in platform-manager views. Actual billing still uses the resolved class. Usage’s realtime-equivalent comparison is an estimate, separate from the recorded actual charge.
Zero is an explicit price and stops price fallback. Generally free or unpriced
models retain their existing access without balance or key-cap headroom. A zero
organization price on a generally paid model does not grant that exemption:
positive account balance or ALLOW_NEGATIVE_BALANCE is still required, and key caps apply.
A positive organization price on an otherwise free model requires credit for
that account only; it does not restrict other accounts. Admission checks tariff
existence without resolving effective purpose/window/class prices per key/model.
Validation and rollout
Run the validator from the same Control Layer release that will apply the files:
dwctl-model-provisioning validate-org-overlays /path/to/org-overlays.d \
  --models /path/to/model-deployments
The validator checks syntax, pricing precision, class/purpose compatibility and model references. You can run it locally or add it to your own CI pipeline. It cannot verify organization existence or future ledger rows in the target database. Check those prerequisites before restarting the server with an updated catalog.
After applying a catalog, verify reconciliation, gateway configuration synchronization, effective prices, a small billed request and key-cap attribution. If consolidating existing model aliases, retain each alias until its callers have moved to the replacement.
Set Up Payments
Enable credit purchases via Stripe so users can buy credits through a self-service checkout flow.
This guide shows you how to enable credit purchases via Stripe so users can buy credits through a self-service checkout flow.
Prerequisites
- A Stripe account with API access
- A Stripe Price configured for credit purchases
- Platform Manager role (for testing)
Configure Stripe
Add your Stripe credentials to the configuration:
payment:
  stripe:
    api_key: "sk_live_..."
    webhook_secret: "whsec_..."
    price_id: "price_..."
    host_url: "https://your-app.example.com"
Or via environment variables:
DWCTL_PAYMENT__STRIPE__API_KEY=sk_live_...
DWCTL_PAYMENT__STRIPE__WEBHOOK_SECRET=whsec_...
DWCTL_PAYMENT__STRIPE__PRICE_ID=price_...
DWCTL_PAYMENT__STRIPE__HOST_URL=https://your-app.example.com
Configuration Options
| Option | Required | Description |
|---|---|---|
api_key | Yes | Your Stripe secret key (sk_live_... or sk_test_...) |
webhook_secret | Yes | Webhook signing secret (whsec_...) |
price_id | Yes | Stripe Price ID for credit purchases |
host_url | Yes | Your app’s URL (for redirect after payment) |
enable_invoice_creation | No | Generate invoices for payments (default: false) |
Create a Stripe Price
In Stripe Dashboard:
- Go to Products → Add product
- Name it something like “API Credits”
- Set the price (e.g., $10.00 for 1000 credits)
- Copy the Price ID (starts with
price_)
The credit amount users receive is determined by the price amount. For example, if your price is $10.00, users receive 10 credits (1 credit = $1.00 by convention).
Set Up the Webhook
Stripe uses webhooks to notify your application when payments complete. This is more reliable than waiting for users to return to your site.
1. Create the webhook in Stripe
- Go to Developers → Webhooks
- Click Add endpoint
- Enter your webhook URL:
https://your-app.example.com/admin/api/v1/webhooks/payments - Select events to listen for:
checkout.session.completed
- Click Add endpoint
- Copy the Signing secret (starts with
whsec_)
2. Configure the webhook secret
Add the signing secret to your configuration:
DWCTL_PAYMENT__STRIPE__WEBHOOK_SECRET=whsec_...
The webhook secret is used to verify that incoming webhook requests actually came from Stripe.
Test with Dummy Provider
For development and testing, use the dummy payment provider instead of Stripe:
payment:
  dummy:
    amount: 50
    host_url: "http://localhost:3001"
Or via environment variables:
DWCTL_PAYMENT__DUMMY__AMOUNT=50
DWCTL_PAYMENT__DUMMY__HOST_URL=http://localhost:3001
The dummy provider:
- Skips actual payment processing
- Immediately grants the configured amount of credits
- Useful for testing the checkout flow without a Stripe account
Warning
Never use the dummy provider in production. It grants credits without collecting payment.
How Users Purchase Credits
Once configured, users can purchase credits from the dashboard:
- User navigates to Cost Management
- User clicks Buy Credits
- User is redirected to Stripe’s hosted checkout page
- User enters payment details and completes purchase
- User is redirected back to your app
- Credits are added to their balance
The checkout flow is handled entirely by Stripe’s pre-built checkout page. You don’t need to build any payment UI.
Admin Credit Grants
Platform Managers can grant credits to users without requiring payment:
- Go to Cost Management
- Select a user
- Click Grant Credits or Remove Credits
- Enter the amount and confirm
This creates an AdminGrant or AdminRemoval transaction in the ledger.
Via API:
curl -X POST "https://your-instance/admin/api/v1/transactions" \
  -H "Authorization: Bearer $API_KEY" \
  -H "Content-Type: application/json" \
  -d '{
    "user_id": "user-uuid",
    "transaction_type": "admin_grant",
    "amount": 100,
    "description": "Welcome bonus"
  }'
Initial Credits for New Users
To automatically grant credits to new users on signup, configure:
credits:
  initial_credits_for_standard_users: 10
Or:
DWCTL_CREDITS__INITIAL_CREDITS_FOR_STANDARD_USERS=10
This creates an AdminGrant transaction when a new StandardUser account is created.
Troubleshooting
Payments complete but credits don’t appear
Check that:
- The webhook is configured correctly in Stripe
- The webhook secret matches your configuration
- The webhook endpoint is accessible from the internet
- Check server logs for webhook processing errors
Webhook signature verification fails
The webhook secret must match exactly. Copy it again from Stripe Dashboard → Developers → Webhooks → your endpoint → Signing secret.
Users see “Payment not completed” error
The frontend may have tried to process the payment before Stripe sent the webhook. This is normal—the webhook will process the payment shortly. Users can refresh the page.
Related Topics
- How Billing Works — Understand credits and transactions
- Set Up Model Pricing — Configure per-token pricing
- Configuration Reference — All payment configuration options
Configuration Reference
Reference guide for configuring the Control Layer using YAML and environment variables.
The Control Layer uses a YAML configuration file with environment variable overrides for all settings.
Configuration File Location
The configuration file is named config.yaml by default. The system checks:
- Path specified via
--configCLI flag - Path in
DWCTL_CONFIGenvironment variable ./config.yamlin the current directory
For Docker deployments, mount your config at /app/config.yaml.
Environment Variable Overrides
Any setting can be overridden with environment variables prefixed with DWCTL_. Nested keys use double underscores:
DWCTL_PORT=8080
DWCTL_AUTH__NATIVE__ENABLED=false
DWCTL_DATABASE__POOL__MAX_CONNECTIONS=20
The special DATABASE_URL variable (no prefix) sets the database connection string.
Core Settings
Server
host: "0.0.0.0"
port: 3001
| Field | Type | Default | Description |
|---|---|---|---|
host | string | "0.0.0.0" | Network interface to bind to. Use 127.0.0.1 for local-only access. |
port | integer | 3001 | TCP port for the HTTP server. |
Secret Key
secret_key: "your-secret-key-here"
Required when native authentication is enabled. Used for JWT signing. Generate with:
openssl rand -base64 32
Admin User
admin_email: "admin@example.com"
admin_password: "change-me-in-production"
Created on first startup if it doesn’t exist. The admin user has the PlatformManager role.
Danger
Change the default admin password immediately in production!
Model Provisioning
model_provisioning:
  enabled: true
  directory: /app/model-provisioning.d
  org_overlays_directory: /app/org-overlays.d
  account_limits_directory: /app/account-limits.d
| Field | Type | Default | Description |
|---|---|---|---|
enabled | boolean | false | Apply the declarative model catalog during startup. |
directory | path | /app/model-provisioning.d | Directory containing one .yaml or .yml document per canonical model. |
org_overlays_directory | path | /app/org-overlays.d | Directory containing one .yaml or .yml document per organisation with per-model serving overrides (default_class or explicit targets, self_hosted_only). Applied after the model catalog when enabled is set. A missing directory is an empty catalog, so a deployment that does not mount one applies no overlays; an existing path that is not a directory fails startup. |
account_limits_directory | path | /app/account-limits.d | Directory containing one .yaml or .yml document per account with its own realtime in-flight limits on virtual models. Applied after the model catalog when enabled is set, replacing every stored per-account limit. A missing directory changes nothing; an empty one clears every per-account limit. See Account limits. |
When enabled, the directory must exist. Startup fails before any provisioning writes if loading, validation, or a referenced endpoint/group lookup fails. See Model Provisioning for the document format and ownership rules.
Database Configuration
The Control Layer requires PostgreSQL. Two modes are available:
External Database (Recommended)
database:
  type: external
  url: "postgres://user:pass@localhost:5432/control_layer"
  replica_url: "postgres://user:pass@replica:5432/control_layer"  # Optional
  pool:
    max_connections: 10
    min_connections: 0
    acquire_timeout_secs: 30
    idle_timeout_secs: 600
    max_lifetime_secs: 1800
| Field | Type | Default | Description |
|---|---|---|---|
url | string | - | PostgreSQL connection URL. |
replica_url | string | - | Optional read replica URL. |
pool.max_connections | integer | 10 | Maximum connections in pool. |
pool.min_connections | integer | 0 | Minimum idle connections. |
pool.acquire_timeout_secs | integer | 30 | Max wait for a connection. |
pool.idle_timeout_secs | integer | 600 | Close idle connections after N seconds. |
pool.max_lifetime_secs | integer | 1800 | Maximum connection lifetime. |
Embedded Database
For development or single-node deployments, use the embedded PostgreSQL database:
database:
  type: embedded
  data_dir: ".dwctl_data/postgres"
  persistent: false
| Field | Type | Default | Description |
|---|---|---|---|
data_dir | string | - | Directory for database files. |
persistent | boolean | false | Persist data between restarts. |
Component Databases
The batch processing system (Fusillade) and request logging (Outlet) can use separate databases or schemas:
database:
  # ... main database config ...
  fusillade:
    mode: schema      # Use schema in main database
    name: "fusillade"
    pool:
      max_connections: 20
      min_connections: 2
  outlet:
    mode: dedicated   # Use separate database
    url: "postgres://user:pass@localhost:5432/outlet"
    pool:
      max_connections: 5
Authentication Configuration
At least one authentication method must be enabled.
Native Authentication
Username/password authentication with session cookies:
auth:
  native:
    enabled: true
    allow_registration: false
    password:
      min_length: 8
      max_length: 64
      argon2_memory_kib: 19456
      argon2_iterations: 2
      argon2_parallelism: 1
    session:
      timeout: "24h"
      cookie_name: "dwctl_session"
      cookie_secure: true
      cookie_same_site: "strict"
| Field | Type | Default | Description |
|---|---|---|---|
enabled | boolean | true | Enable native login. |
allow_registration | boolean | false | Allow self-registration. |
password.min_length | integer | 8 | Minimum password length. |
password.max_length | integer | 64 | Maximum password length. |
password.argon2_* | integer | - | Argon2 hashing parameters. Lower values speed up tests. |
session.timeout | duration | "24h" | Session expiration. |
session.cookie_secure | boolean | true | Require HTTPS for cookies. |
session.cookie_same_site | string | "strict" | SameSite attribute: strict, lax, or none. |
Email for Password Resets
Configure email transport for password reset functionality:
File transport (development):
auth:
  native:
    email:
      type: file
      path: "./emails"
      from_email: "noreply@example.com"
      from_name: "Control Layer"
      password_reset:
        token_expiry: "30m"
        base_url: "http://localhost:3001"
SMTP transport (production):
auth:
  native:
    email:
      type: smtp
      host: "smtp.example.com"
      port: 587
      username: "noreply@example.com"
      password: "smtp-password"
      use_tls: true
      from_email: "noreply@example.com"
      from_name: "Control Layer"
      password_reset:
        token_expiry: "30m"
        base_url: "https://app.example.com"
Proxy Header Authentication
For use with identity-aware proxies (SSO):
auth:
  proxy_header:
    enabled: false
    header_name: "x-doubleword-user"
    email_header_name: "x-doubleword-email"
    groups_field_name: "x-doubleword-user-groups"
    provider_field_name: "x-doubleword-sso-provider"
    auto_create_users: true
    import_idp_groups: false
    blacklisted_sso_groups:
      - "external-contractors"
| Field | Type | Default | Description |
|---|---|---|---|
enabled | boolean | false | Enable proxy header auth. |
header_name | string | "x-doubleword-user" | Header with unique user ID. |
email_header_name | string | "x-doubleword-email" | Header with user email. |
groups_field_name | string | "x-doubleword-user-groups" | Header with comma-separated groups. |
auto_create_users | boolean | true | Create users automatically. |
import_idp_groups | boolean | false | Sync groups from IdP. |
blacklisted_sso_groups | list | [] | Groups to exclude from import. |
Default User Roles
Roles assigned to new users (admin excluded):
auth:
  default_user_roles:
    - StandardUser
    - BatchAPIUser
    - BackgroundInferenceUser
Available roles:
StandardUser- Base access (always included, cannot be removed)RequestViewer- Read-only access to request logsBillingManager- Credit and billing managementBatchAPIUser- Batch file and job managementBackgroundInferenceUser- Spare-capacity background inference submission
Security Settings
auth:
  security:
    jwt_expiry: "24h"
    cors:
      allowed_origins:
        - "https://app.example.com"
      allow_credentials: true
      max_age: 3600
      exposed_headers:
        - "location"
| Field | Type | Default | Description |
|---|---|---|---|
jwt_expiry | duration | "24h" | JWT token lifetime. Must be 5min-30days. |
cors.allowed_origins | list | ["http://localhost:3001"] | Allowed CORS origins. Use "*" for any. |
cors.allow_credentials | boolean | true | Allow credentials. Cannot use with wildcard origin. |
cors.max_age | integer | 3600 | Preflight cache duration (seconds). |
Warning
In production, ensure your frontend URL is listed in
allowed_origins.
Credits & Payments
Initial Credits
credits:
  initial_credits_for_standard_users: 10.00
Credits given to new users on creation. Set to 0 to disable.
Payment Provider
Stripe (production):
payment:
  stripe:
    api_key: "sk_live_..."
    webhook_secret: "whsec_..."
    price_id: "price_..."
    host_url: "https://app.example.com"
    enable_invoice_creation: false
| Field | Type | Description |
|---|---|---|
api_key | string | Stripe secret key (starts with sk_). |
webhook_secret | string | Webhook signing secret (starts with whsec_). |
price_id | string | Stripe price ID for credit purchases (starts with price_). |
host_url | string | Base URL for success/cancel redirects. |
enable_invoice_creation | boolean | Create invoices for sessions. |
Dummy provider (testing):
payment:
  dummy:
    amount: 50.00
    host_url: "http://localhost:3001"
Adds a fixed amount without real payment processing.
Batches Configuration
Configure the batch inference API:
batches:
  enabled: true
  allowed_completion_windows:
    - "24h"
    - "1h"
    - "48h"
  files:
    max_file_size: 104857600        # 100 MB
    default_expiry_seconds: 86400   # 24 hours
    min_expiry_seconds: 3600        # 1 hour
    max_expiry_seconds: 2592000     # 30 days
    upload_buffer_size: 100
    download_buffer_size: 100
| Field | Type | Default | Description |
|---|---|---|---|
enabled | boolean | true | Enable /ai/v1/files and /ai/v1/batches endpoints. |
allowed_completion_windows | list | ["24h"] | SLA options users can select. |
files.max_file_size | integer | 104857600 | Maximum upload size in bytes. |
files.default_expiry_seconds | integer | 86400 | Default file retention. |
Background Services
Onwards Sync
Synchronizes configuration to the AI proxy routing layer:
background_services:
  onwards_sync:
    enabled: true
Note
Disable only if you’re not using the AI proxy functionality.
Probe Scheduler
Runs health checks against model endpoints:
background_services:
  probe_scheduler:
    enabled: true
Only runs on the leader instance when leader election is enabled.
Batch Daemon
Processes batch inference jobs:
background_services:
  batch_daemon:
    enabled: "leader"              # "always", "leader", or "never"
    claim_batch_size: 100
    default_model_concurrency: 10
    claim_interval_ms: 1000
    max_retries: 1000
    timeout_ms: 600000             # 10 minutes per request
    backoff_ms: 1000
    backoff_factor: 2
    max_backoff_ms: 10000
    stop_before_deadline_ms: 900000  # 15 min safety buffer
| Field | Type | Default | Description |
|---|---|---|---|
enabled | string | "leader" | When to run: always, leader, or never. |
claim_batch_size | integer | 100 | Requests claimed per iteration. |
default_model_concurrency | integer | 10 | Concurrent requests per model. |
max_retries | integer | 1000 | Max retry attempts. null = unlimited until deadline. |
timeout_ms | integer | 600000 | Per-request timeout (10 min). |
stop_before_deadline_ms | integer | 900000 | Stop retrying before deadline (15 min buffer). |
Model Escalation
Route requests to fallback models when approaching SLA deadlines:
background_services:
  batch_daemon:
    model_escalations:
      "llama-3.1-70b":
        escalation_model: "gpt-4o-mini"
        escalation_api_key: "OPENAI_API_KEY"  # Environment variable name
    sla_check_interval_seconds: 60
    sla_thresholds:
      - name: "warning"
        threshold_seconds: 3600
        action: "log"
        allowed_states: ["pending"]
      - name: "critical"
        threshold_seconds: 900
        action: "escalate"
        allowed_states: ["pending", "claimed"]
Task Retention
Deletes expired Underway background tasks in bounded batches. Every task carries
a ttl (14 days by default); nothing else removes finished tasks, so without this
daemon the task table grows for the life of the installation and slows every
task claim.
background_services:
  task_retention:
    enabled: true
    interval_seconds: 300
    batch_size: 1000
    batch_pause_milliseconds: 2000
    min_age_days: 14
| Field | Type | Default | Description |
|---|---|---|---|
enabled | boolean | true | Run the retention daemon. |
interval_seconds | integer | 300 | Seconds between sweeps. |
batch_size | integer | 1000 | Rows deleted per statement; each batch is its own short transaction. |
batch_pause_milliseconds | integer | 2000 | Pause between batches of one sweep, to throttle a large backlog. |
min_age_days | integer | 14 | Tasks younger than this are never considered. A task’s own longer ttl is still honoured. |
Every instance runs the daemon; an advisory lock collapses concurrent sweeps to
one. Only succeeded and failed tasks are deleted; pending and in_progress tasks are preserved.
Each batch has a 2-second lock timeout and a 30-second statement timeout.
The daemon uses direct database connections for its session-level advisory lock. For a very large existing
backlog, run scripts/purge_underway_tasks.sh once beforehand so the first
sweeps stay short.
Prompt Cache Retention
Deletes prompt-cache entries that expired more than a grace period ago, in bounded batches. Expired entries serve no request, but nothing else removes them, so without this daemon the prefix table keeps every prefix ever written.
background_services:
  prompt_cache_retention:
    enabled: false
    interval_seconds: 300
    batch_size: 1000
    batch_pause_milliseconds: 2000
    grace_days: 7
| Field | Type | Default | Description |
|---|---|---|---|
enabled | boolean | false | Run the retention daemon. Off by default so a deployment chooses when to start clearing an existing history. |
interval_seconds | integer | 300 | Seconds between sweeps. |
batch_size | integer | 1000 | Rows deleted per statement; each batch is its own short transaction. |
batch_pause_milliseconds | integer | 2000 | Pause between batches of one sweep, to throttle a large backlog. |
grace_days | integer | 7 | Days an entry is kept after it expires. Usage recompute re-derives a past request’s cache split from the entries live at the time, so values below 7 are rejected. |
Every instance runs the daemon; an advisory lock collapses concurrent sweeps to one. Entries are deleted oldest-expiry first; an entry that a request is refreshing or re-writing at that moment is skipped. Each batch has a 2-second lock timeout and a 30-second statement timeout. At the default pace a sweep deletes at most about 1.8 million entries an hour, so an installation with a long existing history clears it over several sweeps without a burst of write and vacuum load.
Leader Election
For multi-instance deployments:
background_services:
  leader_election:
    enabled: true
Uses PostgreSQL advisory locks. Only the leader runs probe scheduler and batch daemon (when set to "leader" mode).
Model Sources
Seed model endpoints on first startup:
model_sources:
  - name: "openai"
    url: "https://api.openai.com"
    api_key: "sk-..."
    sync_interval: "30s"
    default_models:
      - name: "gpt-4o"
        add_to_everyone_group: true
      - name: "gpt-4o-mini"
        add_to_everyone_group: true
| Field | Type | Default | Description |
|---|---|---|---|
name | string | - | Identifier for the model source. |
url | string | - | Base URL of the OpenAI-compatible API. |
api_key | string | - | API key for authentication. |
sync_interval | duration | "10s" | How often to refresh model list. |
default_models | list | - | Models to auto-import on first run. |
Note
Model sources are only seeded on first startup. After that, manage endpoints through the UI or API.
Metadata
UI display settings:
metadata:
  region: "UK South"
  organization: "ACME Corp"
  title: "ACME AI Gateway"
  docs_url: "https://docs.example.com"
  docs_jsonl_url: "https://docs.example.com/jsonl"
| Field | Type | Default | Description |
|---|---|---|---|
region | string | - | Region displayed in UI header. |
organization | string | - | Organization name in UI header. |
title | string | - | Custom browser tab title. |
docs_url | string | "https://doublewordai.github.io/control-layer/" | Documentation link in header. |
docs_jsonl_url | string | - | JSONL docs link in batch upload modal. |
Realtime In-Flight Limits
Each virtual model has a default number of realtime requests one account may
have in flight on it (realtime_inflight_limit), and an
account limit file can give one
account a different limit. Replicas share their counts through Redis:
limits:
  realtime_inflight:
    enforce: true
    redis_url: rediss://:password@limits-redis.example:6379
| Setting | Default | Description |
|---|---|---|
limits.realtime_inflight.enforce | false | Refuse requests over the limit. Off, every request is admitted, so defaults and account limits can be in place before the limit takes effect. |
limits.realtime_inflight.redis_url | unset | Redis holding the shared counts. Unset, or unreachable, each replica counts only its own requests. |
auth.rate_limits is no longer used and is ignored if present.
Batch In-Flight Limits
A virtual model’s batch_capacity also caps how many batch requests may be
in flight on it at once. Unlike the realtime limit, this is a single global
count for the model, not a per-account one: batch traffic is dispatched by
worker pods, so the cap has to hold across all of them. It reuses the same
Redis as the realtime limit but has its own switch:
limits:
  realtime_inflight:
    enforce: true
    redis_url: rediss://:password@limits-redis.example:6379
  batch_inflight:
    enforce: true
    default_capacity: 200
| Setting | Default | Description |
|---|---|---|
limits.batch_inflight.enforce | false | Refuse batch requests that would exceed a virtual model’s effective batch cap. Off, every batch request is admitted and no shared count is touched, so no cap applies however it was configured. |
limits.batch_inflight.default_capacity | 200 | Global batch cap for a virtual model that does not set its own positive batch_capacity. Set to 0 (or null) for no default. Must not be negative. |
A virtual model’s effective cap is its own batch_capacity when that is
positive, otherwise limits.batch_inflight.default_capacity. This default only
feeds the onwards cap: it does not change fusillade’s per-daemon starting
concurrency, which keeps using
background_services.batch_daemon.default_model_concurrency for models without
an explicit batch_capacity. Because an enforced default caps every virtual
model that has not set its own value, raise default_capacity (or set it per
model) wherever batch runs higher than 200, or the first requests past the
default will be refused.
Why realtime and batch differ
Realtime has per-account limits and no per-model cap: when a model is full,
the downstream answers 529, and realtime traffic may grow into whatever
capacity exists (the per-account limit keeps one tenant from consuming it
all). Batch instead has a per-model cap, because batch must never crowd out
realtime and can always be processed later — a refused batch request is
rescheduled, not lost.
batch_capacity means two things
The same settings.batch_capacity value now has two roles:
- fusillade’s starting per-daemon concurrency for the model, which adaptive concurrency may grow beyond, and
- the global onwards cap on batch requests in flight on the alias, once
limits.batch_inflight.enforceis on.
Enabling enforcement therefore turns batch_capacity from a per-pod starting
point into a global ceiling. Raise the value to the intended global cap
before turning enforcement on, or the first batch requests will be refused
against the old, smaller starting point.
The cap is shared by every kind of dispatched request: file batches, flex requests and background requests all count against the same per-model ceiling.
Behaviour over the cap
The Redis connection is shared with limits.realtime_inflight.redis_url;
reachability and per-replica fallback behave the same way. The two limits are
independent and use separate key spaces, so realtime realtime_inflight_limit
and batch batch_capacity can be enforced in any combination. A batch request
over the cap is refused with 529 and code batch_capacity_exceeded (never
429), naming the model and its cap, so the batch dispatcher backs off without
spending a retry attempt and reschedules the request later.
Observability
Metrics
enable_metrics: true
Exposes Prometheus metrics at /internal/metrics.
dwctl_model_batch_inflight_limit reports each virtual model’s effective
global batch cap: its own positive batch_capacity, or the configured
limits.batch_inflight.default_capacity when it has none. It reports even when
limits.batch_inflight.enforce is off, and a model with no effective cap (the
default turned off and no own value) reports 0, so a zero does not by itself
mean the cap is enforced — check the config switch.
Request Logging
enable_request_logging: true
Logs all AI proxy requests and responses to PostgreSQL. Disable if you have sensitive data.
OpenTelemetry
enable_otel_export: false
Exports traces via OTLP. Configure the exporter endpoint with standard OpenTelemetry environment variables (OTEL_EXPORTER_OTLP_ENDPOINT, etc.).
When request analytics and tracing are enabled, the pair http_analytics.trace_id
and gateway_span_id identifies the gateway span for a captured request. Follow
its descendant onwards.provider_attempt spans to the downstream serving spans.
The gateway span’s doubleword.request_id attribute holds the logical request
UUID for reverse lookup in request records.
Trace context must be propagated on every required forwarding hop. Propagation does not itself enable span export: correlation also depends on the connecting spans being sampled, exported, and retained. Stored IDs can therefore refer to unavailable spans, and older analytics records may have no gateway span ID.
Sample Files
Generate sample JSONL files for new users:
sample_files:
  enabled: true
  requests_per_file: 2000
Validation
The system validates configuration on startup and fails if:
- Native auth is enabled but
secret_keyis missing - No authentication method is enabled
jwt_expiryis outside 5min-30day range- CORS uses wildcard origin with credentials enabled
- Database URL is invalid or unreachable
Run validation without starting the server:
dwctl --config config.yaml --validate
Model Provisioning
Model provisioning lets an installation describe its model graph, settings, access and prices in version-controlled YAML instead of recreating rows through the dashboard after installation.
Each file represents one canonical Hugging Face model. The top-level backend
object is reserved for inference-deployment automation and is deliberately
opaque to dwctl. The optional clay object is the part applied to the control
layer.
model: Qwen/Qwen3-32B

backend:
  engine: sglang

clay:
  alias: qwen3-32b
  display_name: Qwen 3 32B
  description: Production Qwen deployment
  type: chat
  capabilities: [reasoning]

  settings:
    realtime_inflight_limit: 64
    batch_capacity: 16
    throughput: 8
    sanitize_responses: true
    trusted: false
    allowed_batch_completion_windows: [24h]
    metadata:
      provider: Qwen

  deployments:
    - alias: qwen3-32b-piccolo
      model_name: Qwen/Qwen3-32B
      endpoint: piccolo
      type: chat
      capabilities: [reasoning]
      settings:
        sanitize_responses: true
        trusted: false
      provider_pricing:
        mode: per_token
        input_per_million_tokens: "0.40"
        output_per_million_tokens: "1.20"

    - alias: qwen3-32b-chiaotzu
      model_name: Qwen/Qwen3-32B
      endpoint: chiaotzu
      type: chat
      capabilities: [reasoning]
      settings:
        sanitize_responses: true
        trusted: false
      provider_pricing:
        mode: hourly
        rate: "18.50"
        input_token_cost_ratio: "0.25"

  routing:
    strategy: weighted_random
    fallback:
      enabled: true
      on_rate_limit: true
      on_status: [429, 499, 500, 502, 503, 504]
      realtime_on_status: [529]
      with_replacement: false
      max_attempts: 3
      backoff:
        initial_ms: 100
        max_ms: 5000
        factor: 2
        jitter: full
      max_total_backoff_ms: 10000
    pools:
      default:
        - deployment: qwen3-32b-piccolo
          enabled: true
          weight: 1
          sort_order: 0
        - deployment: qwen3-32b-chiaotzu
          enabled: true
          weight: 1
          sort_order: 1
      completions:
        - deployment: qwen3-32b-piccolo
          enabled: true
          weight: 1
          sort_order: 0
          strip_leading_bos: true
          render_kwargs:
            add_generation_prompt: false

  tariffs:
    - name: Realtime
      purpose: realtime
      input_per_million_tokens: "0.80"
      output_per_million_tokens: "2.40"
    - name: 24-hour batch
      purpose: batch
      completion_window: 24h
      input_per_million_tokens: "0.40"
      output_per_million_tokens: "1.20"

  cache_tariff:
    write_multiplier_5m: "1.25"
    write_multiplier_1h: "2.0"
    write_multiplier_24h: "3.0"
    read_multiplier: "0.1"
    min_prefix_tokens: 1024

  access_groups: [Customers]
  traffic_rules:
    - action: deny
      purpose: playground
    - action: redirect
      purpose: continuation
      target: qwen3-32b
Identity and references
Database IDs never appear in the catalog. A model’s exact alias is its stable
identity. Existing aliases retain their UUIDs; previously unseen aliases receive
normal database-generated UUIDs. Aliases across all catalog files must also be
unique when compared case-insensitively.
Physical deployments reference inference endpoints by exact endpoint name.
Components and redirect rules reference models by exact alias. Access grants
reference groups by exact group name. Referenced endpoints and groups must
already exist; provisioning does not create them.
A physical deployment shared by multiple virtual models is declared once in one document. Any virtual model in the directory may reference that alias from its pools; repeating the deployment declaration would be an alias collision.
Every virtual model requires a non-empty routing.pools.default. The only pool
names currently supported are default and completions.
Staging class destinations and public prices
clay.class_routes stages explicit destinations on the existing model UUID. This
is preparatory storage: this release continues using the legacy route, general
price, cache configuration and model discovery. Public class prices are deliberately
excluded from runtime tariff/cache histories and existing dashboard price panels;
customer-specific class deals retain their established billing and credit checks.
This release does not accept new inference names or enable class routing. Keep the existing deployments, routing,
tariffs and cache_tariff definitions while staging classes.
# Merge into the existing clay block, retaining its other fields:
clay:
  class_routes:
    standard:
      display_name: Standard
      endpoint: gateway
      upstream_model_name: dynamo-example/model:throughput
      tariffs:
        - name: Standard realtime
          purpose: realtime
          input_per_million_tokens: "1.00"
          output_per_million_tokens: "2.00"
    fast:
      display_name: Fast
      endpoint: gateway
      upstream_model_name: dynamo-example/model:fast
      aliases: [example/model-fast]
      tariffs:
        - name: Fast realtime
          purpose: realtime
          input_per_million_tokens: "2.00"
          output_per_million_tokens: "4.00"
      cache_tariff:
        write_multiplier_5m: "1.25"
        write_multiplier_1h: "2.0"
        write_multiplier_24h: "3.0"
        read_multiplier: "0.1"
The endpoint must exist. Upstream names are configurable, endpoint-scoped strings
that must be nonempty and contain no whitespace. Classes may share a destination.
Class keys retain their IDs when a display name,
destination or price changes. Nonempty class configuration requires standard
and fast, each with a realtime tariff. Additional keys may use lowercase letters,
digits, hyphens and underscores, starting with a letter. The old numeric-target
serving_classes declaration cannot be combined with class_routes on one model.
Existing legacy-only catalogs remain valid.
Batch tariffs are allowed only under standard: batch always resolves to that
class regardless of the submitted name. Other classes cannot declare batch prices
that would never be selected. Model-level batch tariffs remain supported.
Optional aliases are exact synonyms, not discovery entries or extra model rows.
Do not list the primary bare name or generated :fast name as synonyms. Validation
reserves primary class names and rejects collisions with existing models and other
synonyms. Ordinary model creates/renames share the catalog lock and collision check.
Synonyms cannot be rebound to another model/class by a catalog edit; deliberate
private-name migration requires a later, separately validated procedure.
For a model present in the catalog, class routes and synonyms are complete desired state. Omitted synonyms are removed; omitted classes are removed and their public prices retired, preserving tariff history. An unchanged declaration preserves IDs, timestamps and price versions. A whole model omitted from the catalog follows the existing ownership-release rule below, rather than deleting its classes.
Public class tariffs use the existing ledger with user_id = NULL and a class
key. The future resolver order is account/class, account/all-classes, public/class,
then general compatibility price. Batch still exhausts exact completion-window
prices before its standard realtime fallback; zero is a price. Class cache tariffs
contain multipliers, not token prices. They inherit model-level cache enablement
and minimum prefix length; omission inherits the model’s multipliers. Declaring
class multipliers requires a model-level cache_tariff.
The database’s routing_mode defaults to legacy and is outside catalog ownership;
putting it in YAML is rejected. This release is not activation-ready: request
resolution, billing snapshots, reactive forwarding and writer support must land
before switching any model. The catalog refuses edits to models already set to
class_routes, instead of overwriting an active route with a composite definition.
The class-aware SQL resolver is not an activation mechanism: switching this flag
manually would bypass the supported rollout boundary. Class-aware admission,
durable billing/cache context and dashboard readers must be integrated together
before enabling it. Do not enable individual public-price readers in this release.
Deploy this support release and update the catalog validator before publishing
catalogs containing the new field. Do not run an older binary against staged public
class prices: its readers do not distinguish them from general prices.
Authoritative behavior
The complete catalog is loaded and validated before a transaction starts. The
transaction then takes an advisory lock, resolves every reference, clears the
provisioning_source marker from all models, and upserts the catalog. A failure
rolls the entire operation back.
An empty directory, or a directory containing only backend-only documents, is a no-op. No transaction is opened and existing provisioning markers are left unchanged.
For models present in YAML, model fields, physical deployments, components, routing, access groups, traffic rules and active tariffs are authoritative. Manual dashboard changes to those fields remain visible until the next server restart, when YAML restores them. The dashboard displays a warning on such models. Two values are exceptions:
routing.fallback.realtime_on_status(statuses that fail over realtime requests only): when omitted, the stored value is kept.- A component’s
enabledis applied when provisioning creates the component. An existing component keeps its stored value across restarts; enable or disable it through the admin API or dashboard. settings.realtime_inflight_limiton the virtual model (the default number of realtime requests one account may have in flight on it): when omitted, the stored value is kept, and a new model starts at 14. It belongs to the virtual model; setting it on a deployment is an error. Per-account limits are declared in account limit files, not in the model catalog. A request that a traffic rule redirects to another model counts against the limit of the model it named.settings.batch_capacityon the virtual model is the global cap on batch requests in flight on it, enforced by onwards whenlimits.batch_inflight.enforceis on. A deployment’s ownbatch_capacityremains valid and still sets that deployment’s fusillade starting concurrency; only the virtual model’s value becomes the onwards batch cap. A positive virtual-model value is used as the cap; when it is omitted (or non-positive, which is invalid), the model falls back tolimits.batch_inflight.default_capacity(default200). Over the cap, batch requests are refused with529and codebatch_capacity_exceeded, never429. The virtual-model value is dual-purpose: it also seeds fusillade’s per-daemon starting concurrency, which adaptive concurrency may grow past (the configured default does not change that starting concurrency). Turning enforcement on turns that starting point into a global ceiling, so set the value — or raisedefault_capacity— to the intended global cap first. File batches, flex and background requests all share this one per-model ceiling.
The retired settings requests_per_second, burst_size and capacity are
still accepted so older catalogs load, but they are ignored.
Models omitted from YAML are not deleted or otherwise rewritten. Their
provisioning_source becomes NULL, which makes them manually managed again.
Physical models that disappear from an endpoint filter are marked inactive;
endpoint synchronization does not delete or rewrite YAML-owned rows.
Tariff history
Tariffs retain their temporal history. Within an account/class scope, their natural
key is (model, purpose, completion_window), with completion_window required only
for batch. Model-level tariffs remain the public all-class compatibility scope;
each class_routes.<key>.tariffs declaration owns its public class scope:
- An identical active tariff is left untouched, retaining its ID and
valid_from. - A changed tariff closes the active row and inserts its successor at the same transaction timestamp.
- A missing desired key is closed without a successor.
- A reintroduced tariff always creates a new version; historical rows are never reopened, updated in place, or deleted.
Cache tariffs follow the same rule. Provisioning rejects a model with a future-scheduled tariff or cache-tariff version because the startup format has no schedule semantics.
Prices are strings to retain decimal precision. Input and output prices are expressed per million tokens; dwctl converts them to the database’s per-token representation and rejects values that cannot be represented exactly.
Validation and deployment
Validate a rendered directory with the Rust types used at runtime:
cargo run -p dwctl --bin dwctl-model-provisioning -- validate ./model-provisioning.d
Print the generated JSON Schema for editor or generic CI integration:
cargo run -p dwctl --bin dwctl-model-provisioning -- schema
The Helm chart exposes a separate, opt-in ConfigMap through
modelProvisioning.files. It mounts the files at
/app/model-provisioning.d, enables startup provisioning through environment
overrides, and includes the catalog checksum in the pod template so catalog
changes trigger a rollout. An enabled, empty ConfigMap mounts an empty
directory and is a startup no-op.
Organisation catalog validation and ownership
Run the same offline validation used by deployment CI:
dwctl-model-provisioning validate-org-overlays ./org-overlays.d --models ./model-provisioning.d
dwctl-model-provisioning org-schema
Both directories must exist. Validation checks the complete org directory and
references against public clay.alias values in the model catalog. It reuses
startup parsing and pricing validation: duplicate org/model entries, unknown
fields/classes, incompatible purpose/windows, and invalid decimals are rejected.
Cache multipliers must be exactly representable in DECIMAL(6,4): nonnegative,
less than 100, with no more than four significant fractional places. Redundant
trailing zeros are accepted. This avoids silent rounding and repeated versioning.
The API’s cache-pricing writer already validates storage precision.
Offline validation cannot inspect database organisations or future scheduled prices. Check those against the target database before activating a catalog. Future-price errors identify the file, organisation, alias and class.
Declaring an org/model makes YAML authoritative for its overlay and current prices, including existing rows inserted directly in the database. Omitted routing settings inherit defaults; omitted prices retire. Changed prices are versioned without altering historical amounts. Undeclared, unowned pairs are untouched. Future schedules must be resolved before adoption because the catalog has immediate-only semantics. A failed apply rolls back the whole transaction. See Customize Organization Models for examples and the complete ownership contract.
Reconciliation captures one wall-clock timestamp after obtaining the transaction-scoped advisory lock. A waiting replica may have begun its transaction before the winner; its transaction-start timestamp is therefore not a valid price-version boundary. Tests force a real lock wait and verify that the second replica observes the winner’s rows without creating versions.
Ordinary price edits close current tariffs and insert open-ended replacements. A pre-existing future-dated general tariff is different: it already reserves a future interval. Model tariff replacement returns an explicit bad-request error until an operator resolves that schedule; it neither cancels the schedule nor leaves partial model edits. Metadata-only edits are still permitted.
Account limits
An account limit file gives one account its own realtime in-flight limit on
some virtual models, in place of each model’s
settings.realtime_inflight_limit. The account is a user or an organisation,
named by its username, and an organisation’s limit covers every key the
organisation owns. One file per account, mounted at
model_provisioning.account_limits_directory:
account: acme
realtime_inflight:
  example/chat-model: 200
  example/fast-model: 40
Startup applies the files after the model catalog, in one transaction, and replaces every stored per-account limit with what the files declare. Removing a line or a file returns that account to the model’s default on the next start. An empty directory clears every per-account limit; a missing directory changes nothing. An unknown account, or a model that is not a live virtual model, fails startup before any per-account limit is written; the model catalog and organisation overlays have already been applied by then.
Run the same offline validation used by deployment CI:
dwctl-model-provisioning validate-account-limits ./account-limits.d --models ./model-provisioning.d
It rejects unknown fields, limits below 1, an account declared in two files and models absent from the model catalog. Whether each account exists can only be checked against the database, at startup.
GET /admin/api/v1/models/{id}/realtime-inflight-limits returns a virtual
model’s default and its per-account limits, for platform managers.
How Billing Works
Understand the credits-based billing system: how charges are calculated, what happens at zero balance, and how payments work.
The Control Layer uses a credits-based billing system. Users have a credit balance that gets charged when they make API requests. When the balance runs out, API access stops until more credits are purchased or granted.
This page explains how the billing system works conceptually. For setup instructions, see Set Up Model Pricing and Set Up Payments.
Credits
Credits are the currency of the Control Layer. Every user has a credit balance, and API usage deducts from this balance.
Key characteristics:
- Credits are stored as decimal values (up to 8 decimal places)
- Balances can go negative (the last request that pushes you below zero still completes)
- New users can receive initial credits automatically via configuration
- Admins can grant or remove credits manually
Credits aren’t tied to any real currency by default. You decide what a credit is worth when you configure your tariffs and payment amounts.
How Charges Are Calculated
When a user makes an API request, the charge is calculated from two things:
- Token usage — How many tokens were consumed (input and output separately)
- Tariff — The price per token for that model
The formula is:
charge = (input_tokens × input_price) + (output_tokens × output_price)
For example, if a model’s tariff is $0.03 per 1K input tokens and $0.06 per 1K output tokens, a request using 1,000 input tokens and 500 output tokens would cost:
(1000 × 0.00003) + (500 × 0.00006) = 0.03 + 0.03 = \$0.06
What Are Tariffs?
Tariffs define per-token pricing for each model. A model can have different tariffs for different purposes:
- Realtime — Standard API requests
- Batch — Asynchronous batch processing (often cheaper)
- Playground — Interactive testing in the UI
If a model has no tariff, requests to that model are free.
Tariffs are time-versioned, so you can change pricing without affecting how historical transactions are displayed. The system records which tariff was active when each charge occurred.
Organisation and serving-class price precedence
For the requested model, billing uses the API key’s owning account and the resolved serving class. A routing overlay or a price does not itself grant access to a class. An existing private alias keeps its own prices; there is no implicit pricing fallback between model aliases.
First discard tariffs outside their validity interval or for another account or class. Then choose the first eligible purpose/window entry below:
| Priority | Realtime | Playground | Batch/flex, completion window W |
|---|---|---|---|
| 1 | Account + class, realtime | Account + class, playground | Account + standard, batch W |
| 2 | Account all-class, realtime | Account + class, realtime | Account all-class, batch W |
| 3 | General model, realtime | Account all-class, playground | General model, batch W |
| 4 | — | Account all-class, realtime | Account + standard, realtime |
| 5 | — | General model, playground | Account all-class, realtime |
| 6 | — | General model, realtime | General model, realtime |
Playground’s realtime fallback is evaluated within each scope before moving to the next scope. An organisation’s realtime deal therefore beats a general playground price. Batch/flex exhausts all three exact-window batch scopes before trying realtime prices in the same scope order, using only the standard class. A 1h batch price never substitutes for 24h. Realtime/playground use no completion window. Continuation and platform purposes do not select customer prices.
A selected row supplies both input and output prices. Zero is an explicit price and stops fallback; the resolver never chooses the cheapest row or combines fields from different rows. If no eligible price exists, analytics cost remains NULL and no usage debit is created. A missing batch tier uses the realtime safety net first; it remains unpriced only if no eligible realtime price exists either. Configure every supported completion window to avoid unintended realtime charges.
Validity is valid_from <= time < valid_until (an absent end is unbounded).
Batch pricing uses batch creation time; other pricing uses the captured request
time. Within the same scope/purpose/window, the latest valid start wins, then
ascending tariff ID breaks exact ties. The SQL effective billing resolver and
Rust billing use the same rules. Actual usage billing selects tariffs in Rust
after bulk-loading relevant histories; parity tests protect this contract.
Deploy matching API and worker images before activating customer deals.
Customer catalogue and usage comparison
Customer model list/detail prices deliberately present one all-class set:
account all-class deal → general model, separately for each existing
purpose/completion-window tier. Class-specific prices (including standard)
are omitted until there is a public UX for them. Playground can use realtime
within each scope. Batch tries the all-class account and general exact-window
prices before their realtime fallbacks; class prices stay hidden. Price sorting uses
the same display resolver and the existing minimum input-plus-output metric.
Zero is a valid display price; missing prices sort last. The response exposes
effective amounts without organisation/class metadata. Platform managers retain
all scoped token tariffs; organisation-serving controls expose class deals.
Customer cache multipliers similarly use the all-class override, with no class
price map. Existing private aliases retain their own prices.
The /usage realtime-equivalent estimate is a counterfactual comparison, not a
bill. It uses the billed account’s current all-class realtime deal, then its
standard-class realtime deal, then the general realtime rate. Other classes are
ignored. Actual usage totals and cap accounting remain actual resolved-class
charges. The comparison can be cached for 60 minutes.
Zero prices stop pricing fallback and bill zero. Generally free or unpriced
models retain their existing balance and key-cap exemptions. A zero customer
price on a generally paid model does not create a new exemption: the account
still needs positive balance or ALLOW_NEGATIVE_BALANCE, and key caps apply.
The exemption permits negative account balances, not exceeding key caps.
A positive customer deal on a generally free model requires credit for that
account only. Other accounts keep the general free-model behavior. Admission
uses existence checks rather than effective purpose/window/class resolution.
HTTP batch tariff authoring normalizes surrounding completion-window whitespace; YAML authoring rejects it. Unchanged legacy NULL-purpose rows may be preserved during model metadata edits, but cannot be created or repriced through the customer tariff API and are not billable fallback rows. Declaring an org/model in YAML adopts its current overlay and prices. Omitted prices retire; changed prices create new ledger versions. Future schedules block reconciliation, which rolls back atomically. Historical org token/cache prices prevent hard account deletion; normal soft deletion retains them. Released migrations are immutable.
Cache multipliers are selected independently by account + resolved class → account all-class → general model, at the same timestamp. They have no purpose/window dimension. A general cache tariff is required for Control Layer cache pricing to apply; an organisation override alone cannot enable it. Applicable cache-read/write multipliers adjust the selected input token rate.
The Transaction Ledger
All credit movements are recorded in an append-only transaction ledger. Transactions are never modified or deleted — this creates a complete audit trail.
Transaction types:
| Type | Effect | Created By |
|---|---|---|
| Purchase | Adds credits | Payment completion (Stripe) |
| AdminGrant | Adds credits | Admin action |
| AdminRemoval | Removes credits | Admin action |
| Usage | Removes credits | API request completion |
Each transaction has a unique source_id that prevents duplicates. For usage transactions, this is the analytics record ID. For purchases, it’s the payment session ID. This means the same payment or request can never be processed twice.
Balance Calculation
Rather than storing a running balance, the system calculates it from the transaction history. This append-only design means:
- No race conditions when multiple requests complete simultaneously
- Complete auditability — you can always recalculate the balance from transactions
- No data loss from failed updates
For performance, the system maintains checkpoints that cache the balance at certain points, so it doesn’t need to sum every transaction from the beginning of time.
What Happens at Zero
When a user’s balance drops to zero or below:
- The current request completes (balances can go slightly negative)
- The system immediately notifies the API proxy
- The proxy invalidates the user’s API keys in its cache
- Subsequent requests fail with an authentication error
There’s no grace period — blocking is immediate. This prevents users from accumulating large negative balances.
When the user purchases more credits or an admin grants them credits, the process reverses: the proxy is notified, API keys become valid again, and requests start working.
Payment Flow
Users can purchase credits through a self-service checkout flow powered by Stripe (or a dummy provider for testing).
The flow works like this:
- User clicks “Buy Credits” in the dashboard
- Backend creates a checkout session with Stripe
- User is redirected to Stripe’s hosted payment page
- User completes payment
- Stripe sends a webhook notification (or the frontend triggers manual processing)
- Backend verifies the payment and creates a Purchase transaction
- User’s balance increases, API access is restored if it was blocked
The payment amount is configured on the Stripe side (via a Price ID). The Control Layer doesn’t handle payment amounts directly — it just records the credit value associated with successful payments.
Idempotent Processing
Payment processing is idempotent, meaning the same payment can’t be applied twice. The payment session ID serves as a unique key. If a webhook fires multiple times or the user refreshes the success page, only the first processing attempt creates a transaction.
Batch Requests and Billing
Batch requests are charged the same way as realtime requests — per token, based on the tariff. However:
- Batch tariffs can be configured separately (often at a discount)
- All requests in a batch are grouped in the transaction history for easier tracking
- Cost estimates are available before submitting a batch
When viewing transactions, batch charges can be grouped into a single line item showing the total cost and request count, rather than listing hundreds of individual charges.
Free Usage Scenarios
API requests are free (no credits deducted) when:
- The model has no tariff configured
- The tariff prices are both zero
- The request fails (non-2xx response)
- The user is the system user (internal requests)
Generally free or unpriced models remain accessible without balance or cap headroom. A customer-specific zero price on a generally paid model changes its bill, but does not create a new admission exemption.
Related Topics
- Set Up Model Pricing — Configure tariffs for your models
- Set Up Payments — Enable credit purchases via Stripe
- Configuration Reference — All billing-related configuration options
Request retention and database maintenance
Archival removes terminal requests from the active requests table while preserving
results in retained storage. The active table can shrink sharply even while new
requests keep arriving. Its physical indexes may remain large, and inaccurate
statistics must not turn response polling into repeated broad index scans.
Reading a waiting response
PostgresRequestManager::get_terminal_request_detail probes only the request state
by primary identity on the primary database. Running requests return no detail;
terminal requests load the existing detail representation, including retained
routing and ownership checks. If archival removes the live row between these reads,
the existing reader resolves the retained route. ZDR decryption still happens in
the caller after the terminal detail is retrieved.
The full-detail query materializes its ID lookup before applying the ownership
filter. Keep that boundary: moving created_by IS NOT NULL into the lookup makes
the partial user/sort index eligible again. Do not fetch templates or payloads on
every waiting poll. Sequential scans can still be appropriate for tiny tables;
the invariant is avoiding a broad partial user-index scan for one identity.
Automatic maintenance
The migration sets request auto-analyze to an absolute 1,000-change threshold and vacuum/insert-vacuum thresholds to 5,000. These are eligibility thresholds, not execution deadlines. Autovacuum remains responsible for reclaiming reusable space.
Batch and batchless archive passes also check a schema-local maintenance row. All workers share a one-minute cooldown, committed before work begins. A check refreshes statistics after 1,000 changes, or after five minutes when there are unanalysed changes. Fresh statistics need no analyze. An active vacuum is allowed to finish first.
Maintenance uses the primary pool with the same transaction-local schema routing as other storage operations. Lock waits are capped at 250 ms and the analyze statement at 20 seconds. An unfinished attempt pauses subsequent archive passes until its one-minute cooldown expires, including when a worker is cancelled or restarted. Workers allow up to 25 seconds for an in-progress check, waiting without retaining a connection between probes. The daemon’s existing retry loop then retries automatically. Foreground requests do not run or wait for this maintenance check. An already running archive transaction is allowed to complete.
fusillade_request_statistics_maintenance_total{outcome} records analyzed,
deferred, and error. Repeated errors/deferred passes, old table statistics with
continuing changes, growing dead rows, and pool-acquisition latency need operational
alerts. A sustained maintenance failure delays archival; it must not be ignored as
healthy retention progress.
Deployment and verification
Before upgrading a populated database, satisfy any earlier migration prerequisites
in the release. In particular, the preceding retained-response created-index
migration requires scripts/prepare_retained_created_index.sql to have completed;
it fails startup safely if that index is missing or incomplete. That online index
preparation is separate from the statistics-maintenance change.
Apply the additive migration through the normal application migration path, then roll out the application. Old and new replicas can coexist; no table rewrite, blocking index rebuild, or scale-to-zero step is required. The runtime database role must have the requests table owner role’s permissions and be able to update the maintenance row. Existing installations where the runtime role owns the requests table meet this requirement.
Verify automatic analyze timestamps advance under movement, maintenance errors do not accumulate, retention continues making progress, and request latency stays stable. An application rollback can leave the migration in place. The down migration restores the previous maintenance settings and removes the coordination row; run it only after all new binaries have stopped using it.
Tests cover a mostly drained table with misleading partial-index statistics, status polling while template access is blocked, reads during atomic archival, maintenance cooldown/crash recovery, and retry after an analyze lock conflict. These tests run in the existing Arsenal Rust test suite. No manual analyze is required in the deployment sequence. The migration needs a brief metadata lock; its one-second lock timeout lets a busy deployment retry instead of waiting indefinitely in the database lock queue.
This does not shrink existing table/index files, guarantee a particular CPU budget, or replace database-capacity monitoring. Existing excess storage requires a separate assessed online maintenance operation.